The first and still the best vegan cheese I ever made

cheese and apples.jpg

In the first week of my vegan journey, I craved some creamy cheese. I bought a store-made brand and after one taste, dumped the whole tub. That chemically, chalky glop tasted like something that had been made by people who had never had cream cheese.

A quick google search didn’t bring me much luck either – I wanted cream cheese NOW not after eight hours of soaking cashews.

This is what I came up with and it’s still one of the best vegan cheeses ever. It’s so popular with my tribe that my friend, Cathy, specifically requests it for her birthday gift.  This recipe is nearly instant, easy and simple. And best of all, it’s delicious.

Let’s get started.

Cheese ingredients.jpg

Ingredients

¾ cup raw cashews

1 Tbsp apple cider vinegar

1 Tbsp lemon juice

1 tsp salt

1 tsp Dijon mustard

1 clove garlic

2 tablepoons nutritional yeast

2-4 tablespoons water (I used 4 today for a very spreadable cheese).

Cheese.jpg

Directions

Put everything in a blender and whiz until smooth. You may need to scrape down the sides of the blender a couple times.

Serve with crackers, rye toast, slices of apple or tomato.


Moroccan lentil soup

Soup use this one.jpg

The LA Times reported that the top food trends for 2018 spotted on Pinterest include Moroccan cuisine, plant-based proteins and soup. So here’s an on trend recipe that’s easy to make and delicious. It’s also ridiculously good for you with garlic, ginger, turmeric and iron-and-fibre-rich lentils.

My first thought when I encountered this recipe, which is from Healthy Starts Here, was “This is just weird enough to work.” And it certainly does with a hint of tanginess, a touch of sweetness from the apricots and mellow spices.

ingredients.jpg

Ingredients

1 tbsp canola or peanut oil

2 onions diced

4 cloves garlic minced

1-2 inches of ginger root peeled and grated

3 stalks of celery sliced

1 cup of red lentils

1 cup of water

4 cups of vegetable broth

28 oz can diced tomatoes

8 dried apricots

1 tsp cinnamon

1 tsp cumin

1 tsp turmeric

¼ tsp allspice

Optional but awesome – a cup of fresh kale, chard or spinach torn to bite sized pieces.

with kale.jpg

You can add some fresh leafy greens for extra colour, texture and nutrition.

Directions

Measure out your spices and have the garlic and ginger prepped.

Sauté the onion and celery in a very large pot for about 5 minutes until the onion gets a bit golden. Add the spices, garlic and ginger and stir for another minute, heating everything through. Add all the other ingredients and bring to a boil, then reduce to a simmer. Simmer for 45 minutes. Taste and add salt if needed.

If you’re adding any leafy greens, add them after the soup is done cooking, but while it’s still hot. You want to wilt, but not cook the greens.

This recipe makes 4-6 servings and freezes well. I love it with warm pita bread.


Beet, carrot and clementine slaw. So pink. So good.

beets white plate.jpg

 Does anyone else notice their tastes change through the seasons? We’re in the heart of a Canadian winter now and I just cannot get enough of root vegetables and cabbages, kale and broccoli. Perhaps they just happen to be the most appetizing produce available this time of year or maybe our dietary needs really do change with the rhythm of the year.

This salad is earthy and delicious but also sunshine-y with a bit of spice. It’s perfect for brightening up the still-too-short winter days.

 I used a food processor but you could make this dish using a grater and a good knife.

 Let’s get started!

 ingredients.jpg

Ingredients

2 large beets cleaned and peeled.

2 medium or 3 carrots cleaned

2 Tbsp raisins (any type) OR 2 dates with the stones removed

1 shallot peeled

2 Tbsp vegan mayonnaise

1 Tbsp lemon juice (about 1/4 of a lemon)

½ Tbsp maple syrup

1/2 Tbsp curry powder

½ tsp garam marsala

¼ tsp ground ginger

2-3 clementine or mandarin oranges

beet salad close.jpg

Directions

 Whiz the raisins, shallot, and clementines (or mandarin oranges) in a food processor. You’ll end up with a pulp. Remove this pulp and place it in a medium-sized bowl. Add the mayonnaise, lemon juice, curry, garam masala, ground ginger and maple syrup and blend to make the slaw dressing.  

In the same food processor – no need to clean it – switch the blade to finely grate the carrots and beets. 

Add the grated veggies to the salad dressing and toss to combine. You’ll have a furiously fuchsia salad! 

Serve up and enjoy. This dish will last for 3 days in the fridge.


Smoky, vegan pea soup

pea soup close top.jpg

There’s something very homey and comforting about a bowl of pea soup on a cold winter day. I remember my mother making pea soup that started with the leftovers of a ham – leg bone and all – simmering in a pot and imparting its rich, smoky flavour.

But today we have liquid smoke and smoked paprika to the rescue. Pigs and vegans rejoice!

This recipe is fast, easy and will last for 3-4 days in your fridge. In fact, it’s even better the next day.

Let’s get started.

Ingredients

pea soup ingredients (2).jpg

2 Tbsps. oil

1 medium onion diced

2 medium carrots cut into quarter moons or diced

4 cups vegetable broth

1 cup yellow split peas

1– 3 Tbsps. red lentils (the more you add the thicker your soup will be).

½ tsp salt or to taste

1 tsp smoked paprika

½ tsp liquid smoke


thick soup.jpg

The more red lentils you add, the thicker your soup will be. I used 2 tablespoons of red lentils and can stand a spoon up in the soup when it’s cold.

Directions

In a medium-sized pot, sauté the onions and carrots in the olive oil until the onions are translucent (about 2 minutes). Add the remaining ingredients and bring to a boil. Reduce the heat, cover and simmer for one hour until the split peas are tender.

Optional – I like to use a hand blender and give the soup a brief whiz just to make it creamier while still retaining its chunkiness.

Enjoy!

p.s. This soup is wonderful with some crispy fried Sham.


Sham or scam – it’s a pigless ham

spam plated.jpg

Here’s one of the most ridiculously easy and delicious seitan recipes you’re ever going to find. With the investment of just a couple dollars for ingredients and a little more than 2 hours of your time (most of which will be spent watching Netflix while the sham/scam bakes), you’ll end up with a beauty of a faux ham that easily serves 4-5 people.

I had my sham/scam for dinner with sauerkraut and potatoes because I was feeling exuberantly German one night. The next night, still feeling all Teutonic, the sham/scam accompanied a pea soup (recipe to follow).

This recipe, created by Courtney Oliverez, is pretty forgiving and flexible. If you want to substitute in different spices or sweeteners go for it. Just do not play around with the cooking time or temperature or the amount of vital wheat gluten.

ingredients.jpg

Ingredients

Mix in a blender

14 oz can beets, juice and all (not pickled beets)

½ cup water

3-4 Tbsp brown sugar (I find 3 tablespoons is plenty but if you think you want it sweeter, go for the full 4 tablespoons). You could also try maple syrup for a deeper flavour. I haven’t done this yet.

¼ cup olive oil (or peanut oil)

3 Tbsp liquid smoke (yes, that seems like a lot but trust me on this).

2 Tbsp onion powder

2 Tbsp garlic powder (or as I discovered, 1 Tbsp garlic powder and one clove garlic work too)

3 Tbsp miso (either red or white)

1 tsp ground ginger

2 tsp sea or kosher salt (Measure this. With the amount of miso already in this recipe, your sham/scam can end up pretty salty very quickly if you over do the salt)

½ to 1 tsp pepper (preferrably white)

Mix in a large bowl

2 cups vital wheat gluten

¼ cup chickpea flour, almond flour or regular flour

Spam super close.jpg

Directions

Pour the blender ingredients into the bowl of flour. Combine everything with a spoon or your hands (I use my hands). You will end up with a very unappetizing pink and brain-like bowl of goop. Oh boy!

sham mix (2)

The unappetizing brain-like dough. 

Let this mix stand for 15 minutes.

Preheat your oven to 325F.

After 15 minutes, lay a large sheet of heavy duty tin foil out on your counter. Place the dough mix on the foil and shape into an oval loaf. Wrap the dough thoroughly and tightly but leaving a bit of room for the dough to expand. I like to double wrap my seitan, and if you’re not using heavy duty foil, I strongly recommend you double wrap, making sure all the seams are sealed.**

At this point I like to “burp the baby”. Pat and smack the dough to help spank out air bubbles because you do not want an airy, bready loaf.

Place the wrapped dough on a sheet and bake for 2 hours. Remove from the oven and let cool. Seitan is always best if it’s allowed to cool for a minimum of 8 hours in the fridge, but I have to be honest, I almost always eat a slice of sham/scam as soon as it’s cool enough to handle because it’s that good

Out of the oven

Here’s my sham/scam right out of the oven and unwrapped — a fragrant thing of dubious beauty!

** What’s with all the security?? Seitan can explode in the oven if it’s not wrapped well. By the way, that is not my photo; I haven’t experienced the seitanic explosion yet.

exploded seitan (2)

A seitanic explosion caused by poorly wrapped dough. Don’t let this happen to you.


A savoury bread pudding – a luscious side or a decadent dinner

Bread pudding use this one3.jpg

Even in my meat-eating days, my favourite part of a holiday dinner was the stuffing. Just smelling sage and rosemary still takes my mind back to childhood holidays.

Since I wasn’t having any sort of dinner gathering this holiday, I decided to have just stuffing as dinner. With just a few tweaks to my mother’s original recipe, I created this dish which is crunchy, savoury, and full of contrasting textures thanks to the chestnuts, lentils and toasty bread. It can still be served as a luscious side in lieu of potatoes or other starches, or it can be eaten as a main course in its own right with lots of colourful veggies.

The dish is easy and only takes two days to make. Kidding!!! You do need stale bread but if you don’t have two days to let your bread get stale, you can toast it.

Let’s get started.

Ingredients

Bread pudding ingredients.jpg

12-14 oz loaf of stale (or toasted) bread – white or whole grain – cut or torn into bite-sized pieces

3 stalks of celery sliced

1 onion diced

1 cup vegetable broth

100 grams roasted, chopped chestnuts (about 9-11 chestnuts)

½ cup chopped walnuts

¾ cup cooked lentils (about ½ a can if you’re using canned).

1/2 cup margarine

3 tsp poultry seasoning

2 tsp dried sage

1 Tbsp fresh rosemary (or 1 tsp dried)

1 tsp salt

Pepper to taste (I use about ½ tsp)

Directions

Preheat your oven to 375 degrees.

In a very large pot combine the margarine, onion and celery. Heat on a medium-high heat and sauté until the onion just starts to soften. Add the poultry seasoning, sage, rosemary, salt and pepper and mix to combine. Turn off the heat. Add the bread, chestnuts, walnuts and lentils and mix with the margarine-onion-herb mixture to coat all the bread. Pour in the broth and stir again to moisten the bread (the bread will not be wetted through).

Spoon this mixture into a 9”x9” baking pan and pat it down so it’s compressed and firm.

Bake for 20-30 minutes, depending on your oven. You want some crunchy crust to form on the top.

Serve immediately with colourful veggies and vegan gravy.

bread pudding meal.jpg

This savoury bread pudding will keep covered in the fridge for 3 days.

Esther’s Chocolate Pumpkin Brownies

Esthers Brownies 3

Here’s a recipe from Esther’s Kitchen (Esther being none other than media phenomena and fashionista Esther the Wonder Pig) that is so easy, versatile and forgiving, I have to share it.

Esther’s chef, Linda, tried these brownies 11 different ways – each way being equally delicious I’m sure.

Then I tried the recipe two more ways. Again, all fabulously delicious!

The best part – you just bung everything into a food processor or mixing bowl and hand mix, then pour the batter into a parchment-lined pan and bake. You end up with dense, moist, chocolatey and spicy brownies that satisfy.

Here’s Esther’s Kitchen’s original recipe post:

This recipe has been tested using the following choices: almond butter, peanut butter, sunflower butter, agave nectar, brown rice syrup, maple syrup, dairy-free butter, coconut oil, almond flour, all purpose flour and gluten-free baking flour blend. Each one tasted great and had unique flavors. All of the ingredients resulted in a moist brownie that held together well. The brown rice syrup had the least amount of sweetness. This batch was baked with almond butter, almond flour, coconut oil and agave.

Esther’s Pumpkin Brownies

Cuisine: Esther Approved Dessert, Baked Good, Gluten-free and Nut-free options

Prep Time: 10 minutes Bake Time: 25 minutes Cool Time: 15 minutes Yields: 12 (3”x3”) brownies

By: Chef Linda | Esther’s Kitchen

Ingredients

  • 1 cup pureed pumpkin from a 15 oz can or homemade and excess water drained
  • 1/2 cup creamy almond, peanut or seed butter (almond was used)
  • 2 Tablespoons softened coconut oil
  • 1/2 cup agave nectar, maple syrup or brown rice syrup (agave was used)
  • 2 teaspoons vanilla extract
  • 1/2 cup unsweetened cacao/cocoa powder
  • 3/4 cup flour of choice: almond, gluten free baking blend or all purpose (almond was used)
  • 1-1/2 teaspoons pumpkin pie spice
  • 1/2 teaspoon sea salt
  • 1 teaspoon baking soda
  • 1 teaspoon apple cider vinegar Instructions

Directions

1. Preheat the oven to 350°F.

2. Line an 8“ x 8“ baking dish with parchment paper. Press the paper alond the bottom edge and all 4 corners; set aside.

3. Combine all of the ingredients in a mixing bowl or food processor. Use an electric hand mixer or process in the food process until the batter is smooth.

4. Pour all of the batter in the center of the parchment lined baking dish. Scrape out remaining batter from the bowl or food processor. Spread the batter into the corners until you have a level surface.

5. Bake the brownies for 25 minutes. Cool the brownies on a metal rack for 15 minutes.

6. Pull up two sides of paper and lift the brownie out of the pan. Place the paper and brownie on a cutting board. Slice the brownie into 9 pieces or as desired.

Here’s what Chef Linda’s brownies look like.

Esther brownies

I hope you give this amazingly versatile recipe a try and make it your own! The key is to know where you can make swaps:

  • the type of flour
  • the type of oil
  • the type of nut/seed butter
  • the types of sweetener, and
  • the spices.

You can also try add ins such as chocolate chips, walnuts or pecans, even diced candied fruit.

Just do not mess with the proportions of ingredients because that’s where the chemistry is.

Here’s one of my versions:

I used, pumpkin, regular flour, a mix of maple syrup and agave, coconut oil, tahini paste instead of a nut butter, and added a cup of chocolate chips and a big pinch of cayenne pepper. This batch was made in the food processor.

Esthers Browniew mine

For my next batch, I diverged and used: mashed banana and no pumpkin, regular flour, the full amount of coconut oil, almond butter, maple syrup only 1 teaspoon of pumpkin pie spices, ½ teaspoon cinnamon and ½ teaspoon cardamon. I also added a cup of chocolate chips because it’s chocolate and more is more.

Esthers Brownies 3

Why are you still reading? Go make some brownies!!


Chinese-style BBQ porc – it’s the year of the vegan pig

porc more.jpg

Hey, most people don’t go vegan because they don’t like eating meat. They go vegan (usually) because they love animals more.

But vegans are a clever bunch and truly, anything can be made into a vegan dish. Take this Chinese-style BBQ pork. This dish ticks all the meaty boxes for look, feel and taste. It’s delicious and easy though you do have to be patient since there’s a lot of “let it rest” and “marinade” business going on. Your hands on time, however is probably 15 minutes!

I have taken this recipe almost exactly from the excellent blog Runaway Rice (she also has a Youtube video of this recipe). My one notable exception is that I wrapped my seitan in foil, rather than her recommended corn husks.

Let’s get started.

Ingredients

For the seitan

3/4 cup warm water
1/2 Tbsp soy sauce
1/8 tsp salt
1/4 tsp baking powder
2/3 cup vital wheat gluten
1/2 Tbsp vegetable oil
1/4 cup water

For the marinade

1/2 Tbsp paprika
1 tsp garlic powder
1/4 tsp cayenne powder
1/2 tsp 5-spice powder
2 Tbsp tamari or soy sauce
1 Tbsp cooking sherry

1 Tbsp agave

1/2 Tbsp sesame oil

BBQ pork close.jpg

Directions

In a large bowl combine the water, soy sauce, salt and baking powder. Sift in the vital wheat gluten and mix well. Work the dough in your hands making sure all the dry vital wheat gluten is completely incorporated. Take dough in your hands and squeeze and pat it (slap it) and shape it into a large ball. The squeezing and patting  helps to compact the dough and remove any air pockets.  Flatten the dough and return it to the bowl and allow it to rest for one hour at room temperature.

Bring a large pot of water to a rapid boil.

Cut the dough into 3 equal pieces.  Loosely wrap each piece of seitan in tin foil to create a tube shape. Secure the ends by twisting the foil and folding the twist back over the body of the tube of seitan.

Add the foil-wrapped tubes of seitan to the boiling water and reduce the heat so you have a simmering boil. Simmer the seitan for 15 minutes, turning the tubes every five minutes so it cooks evenly. Remove the seitan tubes from the water and place on a plate or in a colander and allow to cool for 5 minutes before unwrapping.

At this point the seitan tubes will look and feel a lot like tofu. That’s perfect.

While the seitan is simmering, prepare the marinade by mixing all the marinade ingredients. Pour the ingredients in a dish or bowl large enough to hold the seitan, and ideally immerse as much of it as possible. Marinate the seitan for a full two hours, rotating it halfway through.

Heat a skillet over medium-high heat. Add the oil and the seitan. Pan fry the seitan on each side for 1 minutes. Pour in the marinade and about 1/3 cup water. Continue to fry the seitan in marinade, turning it every few minutes. Cook for about 5 minutes total until the marinade has reduced down to a caramelized glaze.

Remove from heat and use a sharp knife to cut into medallions.

Makes 2-4 servings.


Festive Pecan-Chestnut-Mushroom Wellington!

Combo pic

I wanted to try something different for this Thanksgiving holiday and BOSH’s mushroom Wellington caught my eye. I liked their concept but found it needed a few tweaks to suit my tastes and North American realities (e.g. Portobello mushrooms where I am in Canada are about 4x larger than their UK cousins and our garlic in southwestern Ontario is at least twice as strong as what’s available more broadly).

I also simplified the assembly, gave some actual measurement to a few ingredients, such as the amount of pie dough needed, and added a few more directions to save unseasoned cooks from incinerating their creations.

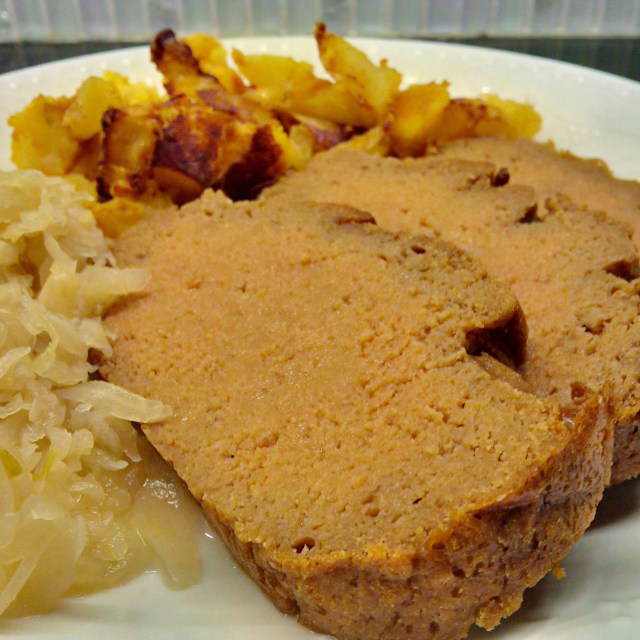
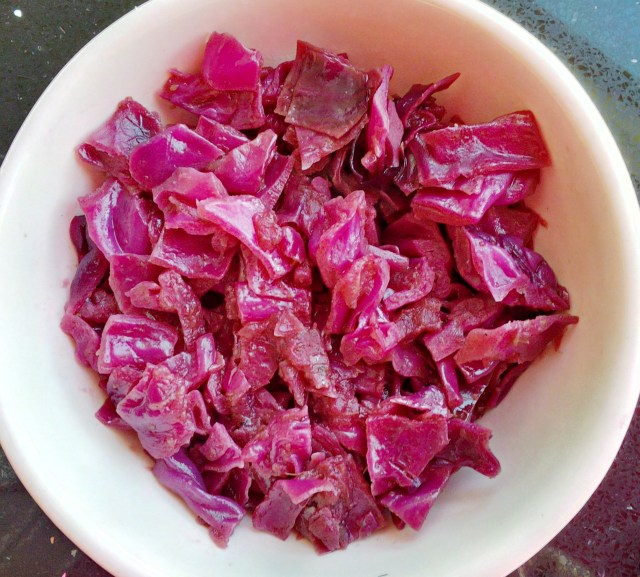
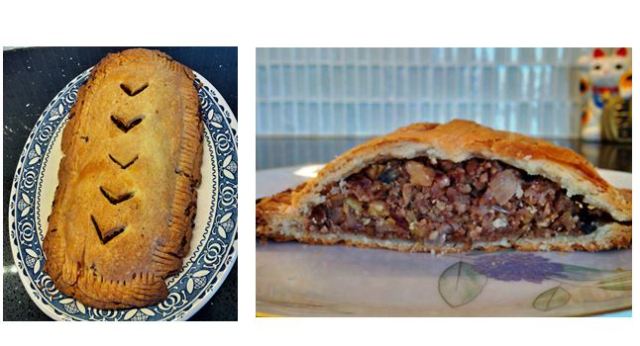
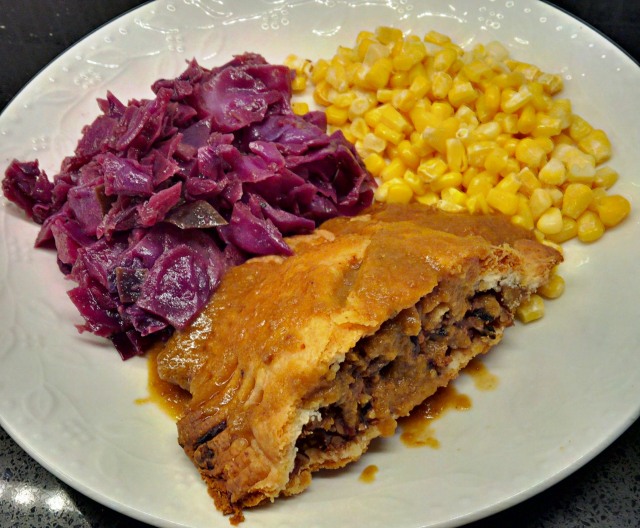
My end result is a festive, pretty and not very mushroom-y creation. I found the dish was a little dry so I served it with gravy.

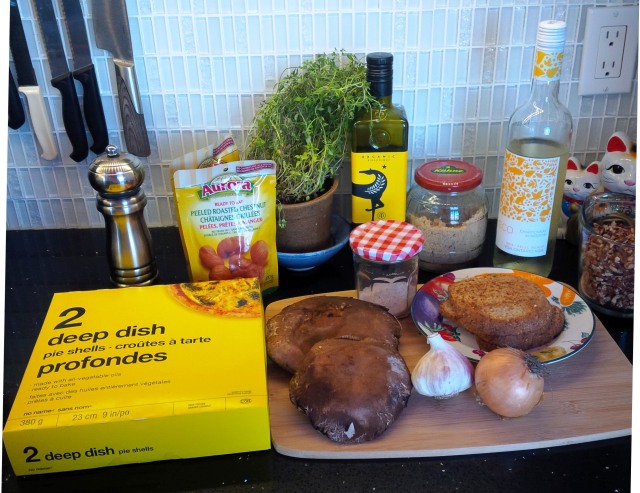
You will need a food processor for this recipe.

Ingredients:

Ingredients.jpg

For the mushrooms:

2 portobello mushrooms – cleaned and stems removed and very gilly pieces removed (I don’t like the gills!)

2 cloves garlic (minced)

1 tbsp fresh thyme chopped or 1 tsp dried thyme

2 Tbsp olive oil

A sprinkle of salt

Few grinds black pepper

For the filling

2 tbsp olive oil

1 onion finely chopped

1 Tbsp fresh thyme chopped or 1 tsp dried

½ tsp poultry season

1 ½ tsp salt

½ tsp ground pepper

1 cup white wine

1 tsp brown sugar

2 cups cooked chestnuts

2 cups pecans

2 slices seeded bread ( I used 3 slices of Ezekiel bread since it’s a smaller loaf)

1/2 cup vegetable stock (or water, or even soy or almond milk)

For the Wellington case:

750 grams of vegan pie crust

About ½ cup flour for rolling out the dough

I buy frozen pie shells because they’re so inexpensive (and I cannot find just vegan pie dough). I let the shells thaw for at least 20 minutes, then use my hands to wad them up into a ball and then roll them out on a floured surface.

If you’re inclined to make your own pie dough from scratch, here’s an excellent recipe.

Plated use this.jpg

Directions 

The mushrooms
Heat your oven to 395F.

Place the mushrooms on a baking tray, stem side up. Sprinkle with the olive oil, garlic, thyme, salt and pepper.

Bake the mushrooms for 15 minutes then set aside and allow them to cool.

Leave your oven on.

While the mushrooms are roasting and cooling, make the filling and prepare the crust.

For the filling

Heat the olive oil in a medium sized frying pan. Add the diced onion and fry until it’s translucent.

Add the thyme, poultry seasoning, salt and pepper and stir to combine.

Add a cup of white wine and cook on low for about 10 minutes, letting the wine bubble and reduce in volume almost entirely. Add the brown sugar and let the mixture caramelize.

Transfer this mixture to a large bowl.

Place the pecans and bread in a food processor and whiz into crumbs. Add to the bowl of onions.

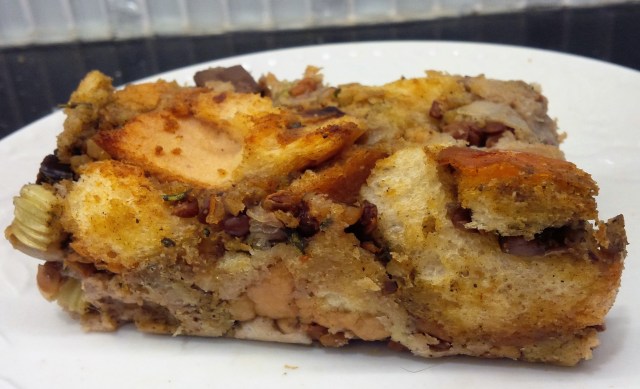
Place the chestnuts and mushrooms in the food processor and whiz until they are like crumbs. Add to the bowl with the onions and pecan mixture and pour in the broth. Stir everything to combine and set aside.

Sprinkle flour on a clean smooth surface and also dust a rolling pin with flour. Take half of your pie dough and roll it out forming a rectangular sheet.*

Place this dough sheet on a large rectangular cookie sheet.

Spoon the mushroom-pecan-chestnut filling running length-wise down the middle of the sheet of dough. You will need to mound the filling and compress it into place with your hand.

Sprinkle your work surface and rolling pin with more flour and roll out the other half of the pie dough to form another rectangular sheet. Place this sheet on top of mushroom-filling mound to form the top crust of your Wellington.

Trim off the edges of the pastry with a sharp knife to form an oval. You can use any excess dough to cut shapes to decorate your Wellington with.

Seal the edges of the dough where the crusts meet with a fork.

If you’re decorating your Wellington with dough shapes (hearts, leaves, stars etc.), add them to the Wellington now. You can adhere them with a little bit of water dabbed onto the Wellington and the dough shape with the tip of your finger

Use a knife or fork to cut slits or holes into the Wellington to let steam escape.

Cover your Wellington in foil and bake for 20 minutes at 395C (See? I told you not to turn off your oven for a reason). After 20 minutes, remove the foil and continue baking the Wellington for 10-20 minutes more depending on your oven. You want a golden finish, with no burning.

Use a bread knife to cut your Wellington into slices.

*Super lazy, easy, just as yummy option if you use premade pie shells like I do– leave two of the pie shells in their pie pans. Fill each pie shell with half the mushroom-pecan-chestnut filling. Roll out the other two pie shells and cut them into tops for the pies. Use a fork to seal the top and bottom crusts. Cut slits in the top crust to allow steam to escape. Bake your mushroom Wellington as per the directions above.

Mom’s German red cabbage – veganized! (Sorry not sorry, mom)

Red Cabbage bowl.jpg

Holiday dinners are so evocative. They’re steeped in tradition and emotion (hopefully happy) and help us measure the rhythm of the seasons and years. For vegans, it can be a hard time sitting at the table and having to forego old family favourite recipes that use animal products.

For me, red cabbage is one of those dishes. My mom made it at every holiday dinner, and only at holiday dinners. I can’t even see a red cabbage in the grocery store without thinking it’s a holiday.

My mother’s recipe calls for 4-6 strips of bacon to be rendered and crushed. Then the apples and cabbage are braised in this fat/pig-belly mixture. Ewww.

With just a bit of tweaking, I’ve figured out how to simulate the savoury, salty, smokiness of the bacon using miso, margarine and liquid smoke. The results are my mom’s recipes taken to the next level of delicious compassion.

Ingredients

Ingredients.jpg

1 red cabbage – remove the outer leaves and then cut out the core. Chop the cabbage into roughly 1 to 2 cm pieces

3-4 apples (I used MacIntosh apples – use a variety that is not sweet). You want a 2:1 ratio of cabbage to apples so adjust how many apples you use based on the size of your cabbage. Peel, core and cut the apples into 1 cm pieces (see image).

diced-apple.jpg

1 tsp liquid smoke

1 Tbsp miso paste

1 ½ Tbsp brown sugar

3 Tbsp cider vinegar*

3 Tbsp vegan margarine

½ cup water

1 tsp salt

1-2 bay leaves (optional)

A few grinds of pepper (optional)

Directions

Melt the margarine in a very large pot over medium heat. Add the miso and liquid smoke and stir to combine. Add the cabbage and apples and water. Stir everything together to get the cabbage apples coated in the margarine mix. Add the vinegar, salt and brown sugar and stir again to combine all. Add the bay leaves if using. Reduce the heat to a simmer and cook, stirring occasionally for about 30 minutes. When it’s cooked, the cabbage volume will have reduced by about a third and the cabbage will be soft but not mushy). The apple will be pretty much impossible to spot. Fish out the bay leaves if you used them and serve the cabbage.

This recipe is also great with vegan sausages, perogies or “white” dishes such as tetrazzini, béchamel or alfredo-sauced pasta or mushroom stroganoff.

*Fun fact – you MUST add vinegar or some sort of acid to red cabbage when you cook it or it will turn the most unappetizing blue-gray hue that’s roughly the colour of sadness.