Fast feta that’s salty, creamy and VEGAN!

IMG_20170603_115756

I used to eat Greek salad all the time until I went vegan, but I just couldn’t find anything to replace feta cheese. ‘Til now that is.

This recipe is the bastard child of a far more superior recipe developed by friends of mine – Katie and Christine. Their feta cheese actually gets firm and will crumble. BUT it also takes more time to make and needs lactic acid (that’s what creatBowl of fetaes the great, firm texture).

My version, lazy vegan that I am, provides immediate gratification with very straightforward ingredients.

Having said all that, I bow to Katie and Christine and their incredible culinary skill!

You will need a food processor to make this recipe.


Ingredients

IMG_20170703_171521_hdr.jpg

½ block (7 ounces) of extra firm tofu.

2 Tbsp olive oil

4 tsp fresh lemon juice (about ¼ of a lemon)

1 Tbsp apple cider vinegar

1 ½ tsp sea salt

¼ tsp onion powder

1 tsp dried basil

1/2 tsp dried marjoram

½ tsp dried oregano

Feta Semi Close

Directions

Slice the tofu lengthwise and press slices in a lint-free towel to remove much of the moisture.

Place all the ingredients in a food processor and process until thoroughly blended. You can store the feta in a sealed container in the fridge for up to 3 days.

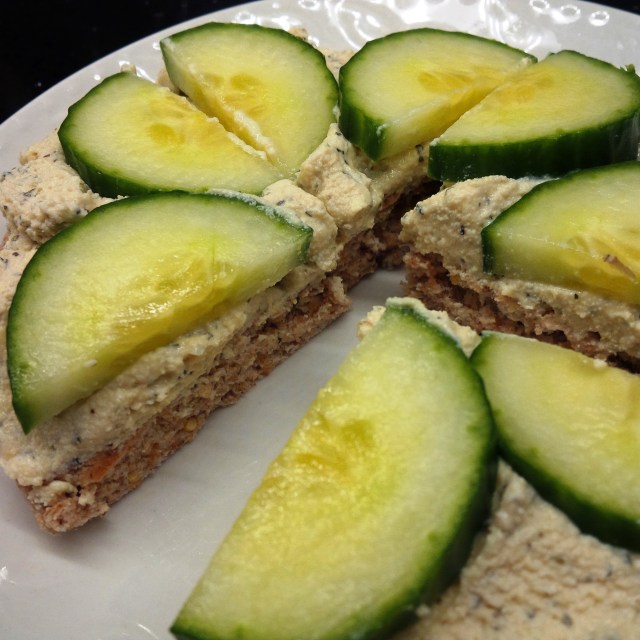
The feta cheese will firm up a bit in the fridge but it will remain creamy and spreadable. If you didn’t press the tofu well, a small amount of white liquid may separate out, which you can just drain off.

You can also make a crumbly feta. Just mix the oil, vinegar, lemon juice, salt and herbs in a bowl to combine. Then crumble in the dried, pressed tofu and stir it so the seasonings coat the tofu.

I use this cheese in wraps, as a spread, tossed with tomatoes, pasta and basil, and of course, in Greek Salad!


Sweet and easy lemon cookies

Lemon Cookies close.jpg

My lemon-loving friend, Michela, came for a visit this weekend so I tried a new recipe out for lemon cookies. These cookies are fast and easy to make, lightly lemony and incredibly addictive.

Ingredients.jpg

Ingredients

2 ½ cups flour

1 cup sugar (or 1 ½ cups sugar if you’re not using agave syrup)

¼ cup agave syrup

2 teaspoons baking powder

1/4 teaspoon salt

3 lemons – from these you will get:

  • 2 Tablespoons lemon zest (you will use all 3 lemons)*
  • ½ cup lemon juice (from 1 ½ lemons)

¾ cup canola or peanut oil

1 tsp vanilla

Lemon Cookies 2

Directions

Heat your oven to 360F.

In a large bowl, combine the dry ingredients – flour, sugar, salt, lemon zest and baking powder. Sift in the baking powder so you don’t have tiny lumps of it.

In a smaller bowl or even a mug, combine the wet ingredients – the lemon juice, oil, agave if using, and vanilla.

Make a well in the dry ingredients and pour the wet ingredients in. Mix with a spoon until combined. You’ll have an almost fluffy dough (that tastes really great even raw).

Drop the dough out by the teaspoon spacing the cookies about 2 inches apart. This is important because the cookies really flatten and spread. You should end up with 2 dozen cookies.

Bake for 8-10 minutes, until the cookies are golden. Let cool completely. The cookies will firm up as they cool.

These cookies would be delicious as part of a cookie sandwich with lemon sorbet!

*So this recipe will leave you with 1 ½ lemons that are sorely lacking most of their protective rind. Wrap the lemons in plastic wrap or store in an airtight container for up to 4 days in the fridge. You can use the lemons for juice for dishes such as linguini in lemon-garlic sauce, lemon tahini sauce, or chili sauce for spicy crispy tofu.

Vegan Singapore noodles with seitanic chicken

SingaporeNoodles Side Bowl.jpg

I have always loved Singapore noodles but it just never occurred to me to try making them at home. I wish I had done this so much sooner because they’re easy to make with some pretty basic ingredients (once you get your head wrapped around the idea you can to make your own chicken in your own kitchen with nary a drop of blood spilled).

Most Singapore noodle recipes include shrimp, chicken and/or barbeque pork. I created my own seitan meat (a/k/a the vital wheat beast) for this dish that combines the savoury flavoury best of all these creatures without any of the pain or death. Yeah!

Let’s get going. The wheat beast takes an hour to make. Check out my next recipe for how to make the seitanic chicken. The rest comes together in about 20 minutes. Easy peasy.

Ingredients

Ingredients.jpg

227g (8 ounces) of rice vermicelli (it usually comes in 454g packages so just use half a package)

1 red pepper julienned

1 small onion cut in half and then in thin slices

2 carrots julienned

1 rib celery cut into thin slices

1 cup of frozen or fresh peas (thaw the peas if you use frozen)

Optional but nice – 1 cup of shredded savoy cabbage or napa cabbage

1 batch of Seitanic chicken a/k/a the vital wheat beast sliced then cut into small strips

1-3 chili peppers sliced very thin (or leave out or use more but the 3 I used made for a very hot dish)

1 Tbsp cooking sherry

2 Tbsp curry powder

1/8 tsp ground cloves

1/8 tsp cinnamon

1/8 tsp ground ginger

3/4 tsp agave nectar (or 1 tsp sugar)

1 Tbsp water

2 -3 Tbsp soy sauce (depending on how salty you like your food)

1 Tbsp toasted sesame oil

1 Tbsp peanut or coconut oil

SingaporeNoodles Far.jpg

Directions

Cook the rice vermicelli according to package directions. They will take about 1 minute in boiling water. Drain and set aside. Once they’re cool enough to handle, cut or tear into shorter pieces so they’re easier to stir fry and eat.

Heat the peanut or coconut oil in large skillet or wok. Add the onion, red pepper, chilis, carrot and celery and stir for one minute. Add the peas, cabbage if using, the seitan, the curry powder, sesame oil, sherry and soy sauce and combine and heat through. Turn off the heat and add the noodles. Stir and toss until the noodles are completely coated in the sauce and are a golden colour. I found it was easiest to toss the noodles using tongs.

Serve up and enjoy!

Seitanic chicken – a/k/a the vital wheat beast

Seitan Dinner.jpg

Don’t let the lumpy ugliness of this “loaf” fool you. This is chicken-flavoured seitan and it’s ridiculously delicious! Does it taste like chicken? I honestly don’t remember. I can tell you that it’s savoury, flavourful yet light, and has the perfect texture – not too chewy and not too moist. It’s also extremely easy to make, requires no skill, and is kind to your budget.

The intended destination for this wheat beast is my Singapore noodles.

Ingredients

Dry ingredients

3/4 cup vital wheat flour

1/4 cup chickpea flour

1 1/2 Tbsp almond meal

2 Tbsp nutritional yeast

1/2 tsp poultry seasoning

1 teaspoon paprika

1 teaspoon onion powder

1/2 teaspoon garlic powder

Wet ingredients

1/2 cup water

1 Tbsp olive oil

1 Tbsp soy sauce

The broth

4 cups vegetable broth

1 Tbsp barbecue sauce

Seitan

Directions

Combine the broth and BBQ sauce and bring it to a boil in a deep pot. You want a vessel where the seitan will be covered in broth but have room to expand a little. While the broth is heating up, make the seitan.

In a medium sized bowl, mix the dry ingredients. Add the wet ingredients. Combine and knead into a ball.

Place the dough ball directly into the pot of broth and reduce the broth to a simmer. Simmer covered for 45 minutes. Remove the seitan from the broth and onto a plate. Allow it to sit for 15 minutes or more before slicing and serving.

I confess, although I made the seitan to go into another dish, I DID eat a whole slice just on its own because it was that more-ish. I think this seitan would be great as a Sunday dinner with mashed potatoes and gravy and a green veggie.

Spicy, crispy tofu – the lazy vegan version

Crispy Tofu close up.jpg

Ahhhhh… spicy, crispy and vegan. I circled this recipe, which is originally from BOSH! because, while enticed by the flavours and textures, I was put off by the amount of work, time and frying involved.

But I could not let this recipe go so here is my altered version of the original video recipe found here.

My version is faster and I bake rather than fry the tofu. The results are delicious!

Ingredients

The tofu strips

12 oz block of extra firm tofu.

½ cup cornstarch

1 Tbsp peanut or coconut oil

The chili sauce

The juice of one lemon (about ¼ cup)

The juice of one large orange (about ½ cup or a little more)

½ cup sweet chili sauce

4 Tbsp soya sauce

2 tsp chili paste (I used sambal oelek). If you really like spicy – use up to 1 Tbsp chili paste.

1 squirt (about ½ Tbsp) Sriracha sauce

SpicyTofu.jpg

Directions

Preheat the oven to 425F. Oil a baking sheet with the peanut or coconut oil.

Cut the block of tofu in half horizontally so that you have two flat slabs. Lay the slabs on a clean, lint-free towel or paper towel and cover with another towel. Press gently with the flat of you hands to squeeze out as much liquid as possible. Cut the tofu into evenly sized strips or cubes.

Put the cornstarch in a large bowl or a large ziplock plastic bag. Add the tofu and toss the tofu to coat each piece with cornstarch.

Place the tofu pieces on the oiled baking sheet and bake for 30 minutes.

When the tofu is done, it will only be browned in some spots. It may even still look white and cornstarch-powdery, but it will be firm and crispy.

While the tofu bakes, make the chili sauce.

Juice the orange and the lemon. Add the juices and all the other sauce ingredients to a large frying pan. Bring to a boil then reduce the heat and let the sauce simmer and bubble for about 5 minutes, stirring frequently. The sauce volume will reduce by a little less than half. Turn off the heat and add the baked tofu pieces and stir to coat the tofu.

Serve and enjoy.

Pucker-up-baby lemon squares

LemonSquares.jpgMy lemon-loving friend, Michela, continues to inspire me to explore lemon-y desserts. Here’s the latest – the most glorious sweet and tart and lemon-y squares with a delightful shortbread crust. I pretty much followed the recipe exactly from My Darling Vegan except I didn’t use Meyer lemons, just the usual kind, which are much larger.

I didn’t know that Meyers were rather miniature so I ended up with a lot of leftover lemons… and you know what to do when life hands you lemons, right? Tequila time! But I digress.

ingredients.jpg

Here is My Darling Vegan’s recipe.

My only comments on My Darling Vegan’s recipe are:

1) you need the juice of 1 ½ regular lemons or 5-6 Meyer lemons.

2) you cannot whip this recipe up in a hurry. It’s simple but there’s cooling time needed in between steps.

So get baking! My edits/comments are clearly marked for you.

Shortbread Crust

1/2 cup vegan margarine

1/4 cup granulated sugar  (Make sure it’s vegan – some white sugars are “filtered” white using charred animal bones so check that the brand you’re buying is vegan or go with an unrefined granulated sugar.)

1 teaspoon lemon zest

1 cup all-purpose flour

Meyer Lemon Curd

1 package (12 oz) extra firm silken tofu

1/2 cup fresh Meyer lemon juice (5-6 lemons) or just lemon juice (1 ½ lemons)

1 teaspoon lemon zest

1 cup granulated sugar

1/4 cup powdered sugar

2 tablespoons cornstarch

1 teaspoon vanilla extract

SquaresClose.jpg

To make the crust

Preheat the oven to 350 degrees F. Line an 8×8 square baking pan with parchment paper and set aside.

In a stand-up mixer with the paddle attachment, beat Use a wooden spoon to cream the butter, sugar, and lemon zest together until smooth and creamy. Add the flour and mix until well incorporated.

Press the dough into the prepared pan and bake for 20 minutes until light golden brown. Remove from the oven and let cool for at least 15 minutes.

Do not switch the oven off yet.

To make the Lemon Curd

In a food processor combine tofu, lemon juice, zest, and granulated sugar and process until smooth and creamy, scraping down the sides as necessary.

Add the powdered sugar, cornstarch, and vanilla extract and process again until combined.

Pour onto the cooled crust and bake for another 25-30 minutes still at 350F until the lemon curd has set.

Let cool at room temperature for 20 minutes and then place in the refrigerator to cool all the way.

Dust with powdered sugar or candied lemon slices just before serving.

To cut, lift the dessert right out of the pan using the parchment paper. Cut into slices – should make 12-16 squares

Spicy orange and pepper stir fry

Orange Tofu 3.jpg
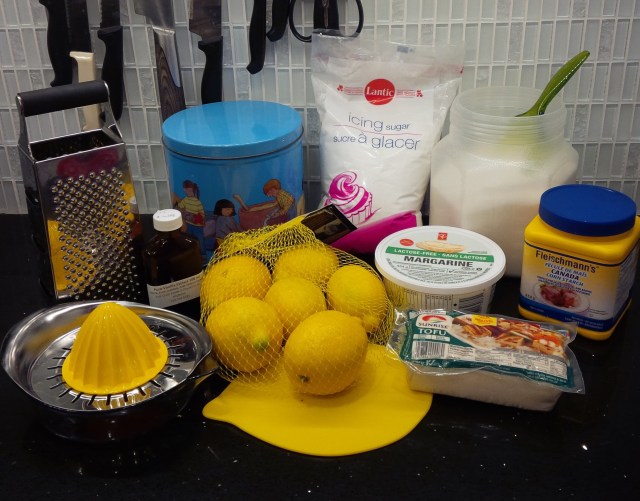
For most of my adult life, I have sucked at making stir fries. I just didn’t have a clue what to do or what ingredients to add. That’s changed and now I’m stir frying like a boss thanks to the many great recipe sites out there.

This recipe is from the Vegan Richa site with just a few modifications; I added more veggies. If I could find them, I’d add those cute, sweet little baby corns too but they remain elusive.

I hope you make this recipe. It’s beautiful enough to serve to guests and delicious and different.

Ingredients

Ingredients.jpg

3 tsp cornstarch (use arrowroot to make corn-free, add more starch for thicker sauce and glaze)

2 Tbsp warm water

2 Tbsp soy sauce or liquid aminos

2 Tbsp rice vinegar

2 Tbsp maple syrup, agave or 1 Tbsp raw sugar

1 Tbsp Asian Hot Chili paste (I used Sambal oelek and 1 tablespoon made this dish plenty hot! )

The juice and zest of one naval orange

1 Tbsp flavourless oil for stir frying. I use peanut oil.

7-8 ounces of very firm tofu patted and dried and cut into cubes.

2-3 cloves garlic, finely chopped/sliced (not minced)

1/2 green bell pepper thinly sliced

1/2 red bell pepper thinly sliced

1 can (about ¾ cup) sliced water chestnuts drained

Orange Tofu 2

Directions:

In a small bowl or cup, whisk the cornstarch and water. Add the soy sauce, rice vinegar, maple syrup, hot chili sauce, orange juice and zest. Set aside.

Heat the oil in a very large nonstick pan or wok over medium-high heat. Add the tofu cubes and fry until the cubes are browned on several sides.  This will take about 5 minutes. Add the bell peppers and sliced garlic and give a quick stir – about 1 minute.

Add the sauce and cook for about 3 more minutes until the sauce thickens.

Serve with rice, rice noodles or glass noodles.

This recipe makes 2-3 servings depending on how much rice you want to eat it with. I find it’s quite saucy and spicy so it can easily 2 ½ cups of cooked rice – enough for 3 servings.

Seitanically good bbq ribs!

SeitanClose.jpg

I’m just started a new job, which means I spend time with a lot of new people who are curious about my vegan diet. One thing I’ve been asked a lot is “what was the hardest food to give up” or “what do you miss the most”.

The straight up answer: I missed cheese the most, though I’m over that now that I’ve discovered many great commercial brands and make my own cheeses too. I missed bacon a lot, but that’s over too thanks to rice paper bacon and an even deeper love for the living pigs I’ve met.

But sometimes I just want something meaty, chewy and barbecue-y. Thanks to “wheat meat” or what’s properly called vital wheat gluten, I can have BBQ ribs in a jiffy that satisfy my cravings and harm no one.

Wheat meat is better known as seitan (pronounced say-tan) and like its almost namesake, it’s a tempter.

Seitan is for you if you want to eat something that’s ridiculously easy to make, inexpensive, super nutritious and versatile. That would be everyone I hope.

Seitan is also for you if you just get a kick out of saying “hail seitan” like I do.

Seitan is NOT for you, if you have any gluten issues. Seitan is gluten.

This recipe is from BOSH!

Ingredients

1 cup vital wheat flour (also called vital wheat gluten or 80% wheat protein flour)

2 Tbsp nutritional yeast

1 Tbsp smoked paprika

1 Tbsp soya sauce

1 Tbsp onion powder

1 tsp garlic powder

1 tsp liquid smoke

½ tsp ground pepper

¾ cup vegetable stock

½ cup of your favourite barbecue sauce (homemade or bottled). Check the ingredient list to make sure the sauce is vegan, but it probably is.

More barbecue sauce for dipping.

SeitanFullPlate.jpg

Directions

Heat your oven to 350F.

Grease a small cookie sheet or baking dish.

Mix all the ingredients in a bowl until you have a fist-sized, springy dough ball.

Using your hands, spread the dough out on a greased cookie sheet or in a baking dish so that you have a rectangle that’s about 9”x 4”.

Bake for 20 minutes then remove from the oven and spread the ½ cup barbecue sauce over the now puffed and ridiculous looking seitan (the exuberance of the seitan’s rising and springiness make me laugh). Bake for another 5 minutes.

Remove from the oven and cut into “ribs”.

That’s it. So easy. Enjoy!

Thug Kitchen’s Apple Baked Beans

Finishedbowl1.jpg
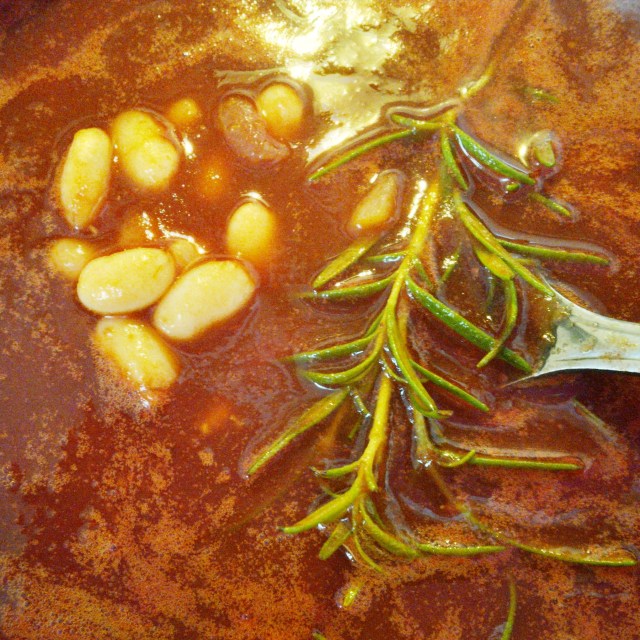
These “baked” beans are a misnomer since they’re cooked entirely on the stovetop. That means, though, that they’re a great dish to make all year round. They’re tangy, sweet and just a little bit different thanks to the addition of diced apple and fresh rosemary.

I follow the Thug’s recipe faithfully except for a few tweaks: maple syrup, liquid smoke and salt (don’t add the salt ‘til the end; you may not need it). Here’s their recipe, tidied up a bit for delicate sensibilities (that would not be mine) and with photos, which are not in the cookbook.

There is some overnight prep involved – read the recipe all the way through!

Ingredients.jpg

Ingredients

1 ½ cups dried white beans (I use a mix of navy beans and Great Northern beans)

2 tsps olive oil

½ onion diced

1 clove garlic minced

1 tsp smoked paprika

½ tsp liquid smoke

15 oz can tomato sauce

1 Tbsp molasses

2 Tbsp maple syrup (or brown sugar)

1 Tbsp apple cider vinegar

2 tsps soy sauce or tamari

1 tsp sea salt (optional)

1 sprig rosemary (sprig should be about 6-8” long)

2 ½ cups vegetable broth

1 medium apple washed but not peeled, cored and cut into pieces about the size of your pinky fingertip. I use either a Granny Smith or Macintosh apple.

Directions

Soak the beans in a big bowl of water for 8 hours. I soak my beans in the fridge overnight.

Heat the olive oil in a large pot. Sauté the onion for about 5 minutes, until it’s starting to turn golden. Add the garlic and paprika and cook for another 30 seconds.

Add the drained beans, tomato sauce, molasses, vinegar, maple syrup (or brown sugar), liquid smoke, vegetable broth and rosemary. Stir it all up. This is the “witch’s brew” stage or as the Thug’s say it will look like you’re “trying to cast a spell or some shit”.

beansrosemary.jpg

Simmer this all together for about 1 hour. The leaves will have fallen off your rosemary so just fish out the remaining twig.

At this point, taste the beans and add salt, if you want.

Stir in the chopped apple and simmer for about another 30 minutes.

Serve up immediately. This dish will last for 4 days in the fridge and freezes well. It makes 4 extremely filling servings.


Samosa Pie – when East meets West, it’s the best

SamosaPie.jpg
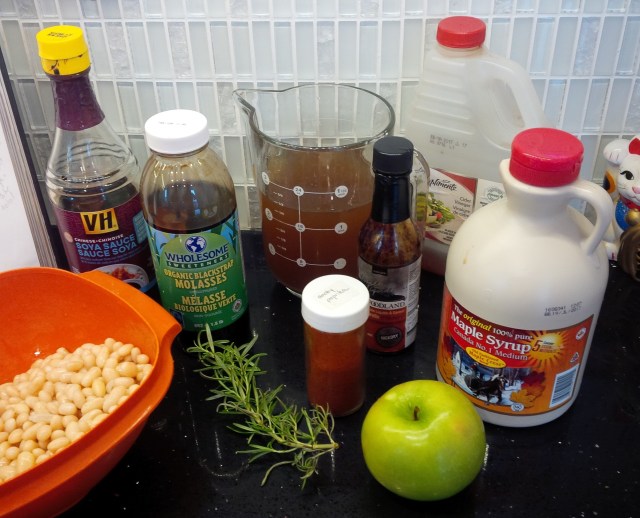
I love samosas and I love pie. Here’s the perfect marriage of the two with all the deliciousness of samosas and none of the fiddling with dough or deep frying.

A samosa pie is an impressive dish to serve up and guaranteed to make your mouth happy. Don’t let the list of ingredients or steps deter you; this is one worthy creation!

 Ingredients

SamosaPieIngredients.jpg

2 already-prepared, vegan pie crusts* left out to thaw for about 15-20 minutes.

1-2 Tbsp flour for rolling your dough

1 Tbsp flavorless oil – I use peanut oil

4 medium potatoes, peeled and quartered

1 small onion, diced (1/2 cup)

1 medium carrot, diced (½ cup)

3 cloves garlic, minced

1 cup frozen peas

1 cup of chopped spinach

1 cup of cooked chickpeas (if using canned, drained and rinsed)

1 cup low-sodium vegetable broth

2 tsp. agave nectar or sugar

2 Tbs. unflavoured plant milk (I use almond milk)

The spices

1-2 teaspoons coriander seeds (if you hate coriander, use cumin seeds)

1 tsp. curry powder

1 Tbsp garam masala

1 tsp. ground ginger

½ tsp. ground cumin

⅛ tsp. red pepper flakes, optional

SamosaPieClose.jpg

Directions 

In a large pot, boil the potatoes until they are fork tender. That will take about 15 minutes. Drain them and roughly mash them so that they are still quite lumpy.

While the potatoes boil, measure all your spices into a small bowl or cup.

Pre-heat your oven to 375F.

Heat the oil in a large frying pan. Sauté the onion, garlic and carrots until the onion is translucent. Push the onion/carrot mixture to the side of the pan and place the spices in the centre of the pan. Heat the spices until they become fragrant then turn off the heat and mix the spices in with the onion/carrot mixture.

Add this mixture to the mashed potatoes. Stir in the broth, frozen peas, chickpeas, spinach, soy or almond milk and sugar or agave and mix everything well.

Spoon this mixture into an 11” deep dish pie plate.

Using your hands wad the two pie crusts into a dough ball. Dust a rolling pin with flour and working on a floured surface, roll the dough out until you have an 11” disk.

Place this disk onto the samosa pie filling and press down the edges of the pie crust to seal in the pie. Use a knife to cut a few slits in the top of the pie crust to let steam vent.

Wrap the edges of the pie crust in tin foil so they don’t burn. The edges always seem to brown faster than the centre of the pie.

Bake your pie for 30 minutes then remove the foil from around the edge of the crust. Bake another 45 minutes. Let the pie stand for about 10 minutes before serving. Serve with bottled tamarind sauce.

*Vegan pie crusts are quite common and use vegetable oil or vegetable shortening instead of lard.

Here’s an excellent recipe and instructions on making pie crust, if you’re inclined to bake right from scratch. It really isn’t hard at all and only takes a few extra minutes!