Vegan cornbread muffins – savoury and not too sweet

mountain of muffins.jpg

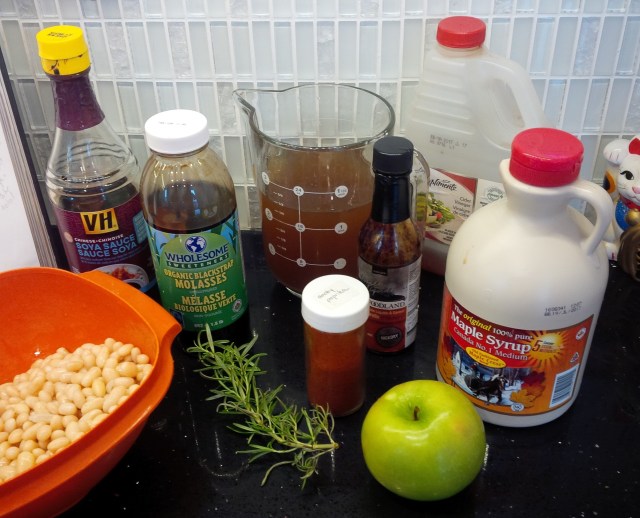
It’s only November but we are having a bona fide wintery day – a perfect afternoon for making my version of the Thug Kitchen Apple “Baked” Beans to have with cornbread.

I found this highly rated recipe from Loving It Vegan.com and gave it just a couple tweaks to make it less sweet and faster to make (Lazy, impatient… yes, I’m that vegan).

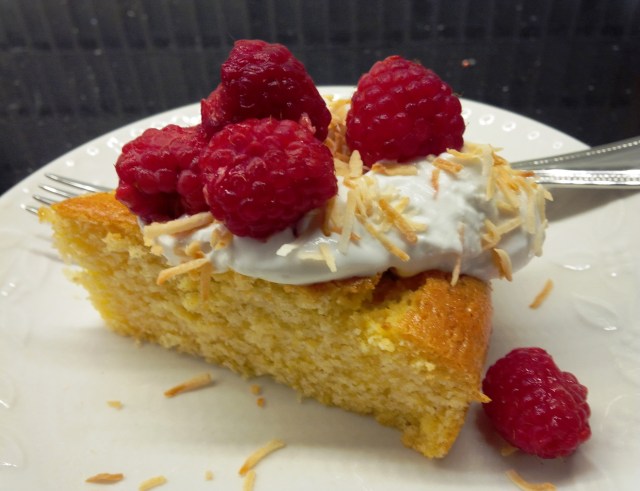
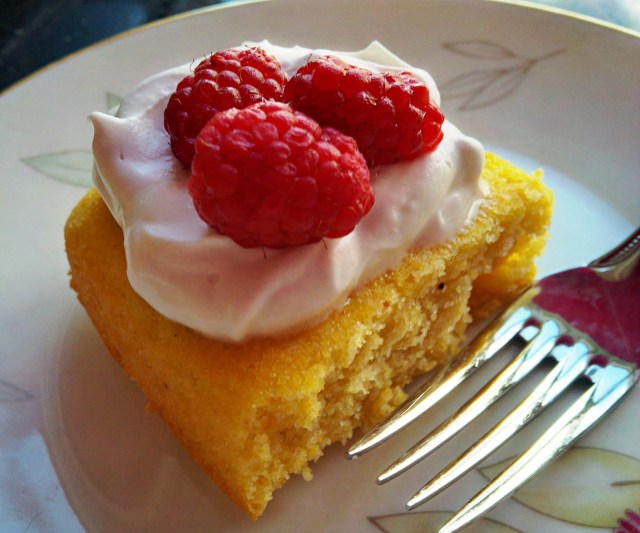
The resulting cornbread muffins are delicious – super moist, tasty and a great texture.

Here’s the original recipe with my edits indicated as either strike throughs or italics.

muffin close.jpg

Ingredients

1 heaped cup cornmeal

1 cup + 3 Tbsp all purpose flour

1 tsp baking powder

1 tsp baking soda

1/2 tsp salt

1/2 cup (115g) vegan margarine or coconut oil. I used a mix of both.

½ cup 3 Tbsp brown sugar

2 Tbsp maple syrup

1 flax egg (that is 1 Tbsp ground flax and 3 Tbsp water stirred together until it makes a brown snot)

1 cup non-dairy milk (I used unsweetened almond milk)

1 Tbsp (15ml) apple cider vinegar

1 15oz (425g) can whole sweet corn drained and rinsed.

muffins.jpg

Directions

Preheat the oven to 400 degrees fahrenheit (200 degrees celsius).

Sift all the dry ingredients except the corn and brown sugar together in a mixing bowl. And I’m serious about the sifting part – don’t skip this step or you’ll get weird, fizzy, salty bits of baking soda and baking powder in your muffins.

Add the apple cider vinegar to the soy milk and set aside.

In a very small pot melt the vegan margarine and/or coconut oil with the brown sugar and maple syrup. Do not do this step in the microwave – it’s too easy to have a painful and messy accident with superheated fats and sugars. The stovetop method is slow and safe.

Make a well in the dry ingredients. Add the oil-sugar mixture, the flax egg and the milk and vinegar mixture. Stir to combine everything, but don’t over stir. Add the canned corn and stir to incorporate.

Grease a mini-muffin tin and add the batter – about 2 heaping tablespoons per muffin cup.

 Bake for 20 minutes or until a toothpick inserted into the center comes out clean.

Fudgy Thugsicles

fudgsicle

Whatcha gonna do with leftover tofu? I made Fudgy Thugsicles – named because the recipe comes from the first Thug Kitchen cookbook. These delicious beauties need just three ingredients and a popsicle mold, which you can buy at any dollar store.

I ended up with four Thugsicles, but I imagine I could have gotten five if I wasn’t licking this spoon so much.

And hear this – for all you people who feel the need to count protein grams, (Why?? I promise you’re getting enough protein if you live in the Western world) each Thugsicle has 9 grams of protein!  I give you permission to eat these for breakfast or after a workout.

You will need a blender for this recipe.

Ingredients

1/2 cup non-dairy milk

3/4 cup dark chocolate chips (make sure they are vegan – look for things like whey or butter, though cocoa butter is okay!)

6 ounces firm tofu (that’s 1/2 of a block typically)

Directions

In a mug, warm the milk in the microwave just so it’s warm but not hot.

Melt the chocolate chips in the microwave — be VERY careful with this. Chocolate can go from looking not melted to scorched in a flash. I prefer melting chocolate in a double boiler. If you don’t have a double boiler, bring water to a boil water in a small pot. Switch the heat off. Put the chocolate in a metal bowl on top of the hot water. Stir the chocolate constantly – it’ll melt almost immediately.

Break the tofu into chunks and put it in the blender. Add the milk and chocolate and blend the hell out of everything until you have a smooth pancake batter type consistency. Pour the mix into the popsicle molds and put the molds in the freezer until the Thugsicles are completely frozen.

Enjoy!

Thug Kitchen’s Apple Baked Beans

Finishedbowl1.jpg
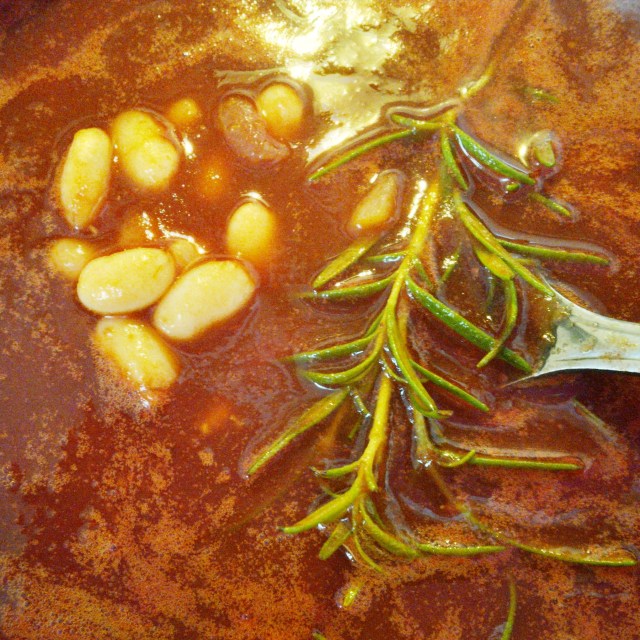
These “baked” beans are a misnomer since they’re cooked entirely on the stovetop. That means, though, that they’re a great dish to make all year round. They’re tangy, sweet and just a little bit different thanks to the addition of diced apple and fresh rosemary.

I follow the Thug’s recipe faithfully except for a few tweaks: maple syrup, liquid smoke and salt (don’t add the salt ‘til the end; you may not need it). Here’s their recipe, tidied up a bit for delicate sensibilities (that would not be mine) and with photos, which are not in the cookbook.

There is some overnight prep involved – read the recipe all the way through!

Ingredients.jpg

Ingredients

1 ½ cups dried white beans (I use a mix of navy beans and Great Northern beans)

2 tsps olive oil

½ onion diced

1 clove garlic minced

1 tsp smoked paprika

½ tsp liquid smoke

15 oz can tomato sauce

1 Tbsp molasses

2 Tbsp maple syrup (or brown sugar)

1 Tbsp apple cider vinegar

2 tsps soy sauce or tamari

1 tsp sea salt (optional)

1 sprig rosemary (sprig should be about 6-8” long)

2 ½ cups vegetable broth

1 medium apple washed but not peeled, cored and cut into pieces about the size of your pinky fingertip. I use either a Granny Smith or Macintosh apple.

Directions

Soak the beans in a big bowl of water for 8 hours. I soak my beans in the fridge overnight.

Heat the olive oil in a large pot. Sauté the onion for about 5 minutes, until it’s starting to turn golden. Add the garlic and paprika and cook for another 30 seconds.

Add the drained beans, tomato sauce, molasses, vinegar, maple syrup (or brown sugar), liquid smoke, vegetable broth and rosemary. Stir it all up. This is the “witch’s brew” stage or as the Thug’s say it will look like you’re “trying to cast a spell or some shit”.

beansrosemary.jpg

Simmer this all together for about 1 hour. The leaves will have fallen off your rosemary so just fish out the remaining twig.

At this point, taste the beans and add salt, if you want.

Stir in the chopped apple and simmer for about another 30 minutes.

Serve up immediately. This dish will last for 4 days in the fridge and freezes well. It makes 4 extremely filling servings.


Little lemon thugcakes with creamy lemon frosting

LemonCupcakeClose.jpg

My friend, Michela, likes lemon-y baked goods so I made her a batch of lemon cupcakes with creamy lemon icing. The recipe is from The Thug Kitchen cookbook with a few alterations (and no swearing – because the recipe is that easy!).

Ingredients

The cupcakes

1 ½ cups fine cornmeal (the kind you make polenta with)

¾ cups flour

¾ cup sugar (make sure it’s vegan sugar –not filtered through animal bone char! In Canada, Redpath sugar passes muster)

2 teaspoons baking powder

½ teaspoon salt

1 ½ cups coconut milk (a 13oz can)

1 teaspoon vanilla extract

The zest from ½ a lemon

The lemon icing

3 cups of icing sugar

½ cup vegan margarine at room temperature

1 tsp vanilla extract

2 Tbsp lemon juice (the juice of ½ lemon)

LemonCupcakeBit.jpg

Directions

Heat your oven to 375F. Grease a mini cupcake tin.

To make the cupcakes

Mix all the dry ingredients in a big bowl. Sift in the baking powder because you do not want to find weird, salty lumps of baking powder.

Make a well in the dry ingredients and the wet ingredients. Stir until you have a moist batter with no dry pockets and few lumps.

Spoon the batter into the cupcake tin and bake for 12 minutes or until a toothpick inserted in the centre comes out clean. Pop out each cupcake onto a platter and allow them to cool completely before frosting them.

To make the frosting

Mix all the ingredients together until you have a smooth creamy frosting. Be patient. You will feel like you can’t possibly get all that powdery sugar – which will fly everywhere if you are rushing – to incorporate into the small amount of margarine and liquid, but you will.

When the cupcakes are cooled to room temperature, spread about 2 teaspoons of frosting on each cupcake.

This recipe makes an ample amount of frosting because in my world, more is more.

This recipe makes two dozen mini-cupcakes.


The Thug’s best cake

coconutcake3

I’ve been wanting to make this cake for nearly two years, ever since I was given The Thug Kitchen cookbook as a birthday gift. I’m so glad I finally had the occasion to make cake, because it’s divine – light, tasty, moist, super easy and just glorious.

Let me save you all that Thug swearing and share this recipe and my two riffs on it. Then go make the cake. JFDI, baby!

Ingredients

1 ½ cups fine cornmeal (the kind you make polenta with)

¾ cups flour

¾ cup sugar (make sure it’s vegan sugar –not filtered through animal bone char! In Canada, Redpath sugar passes muster)

2 teaspoons baking powder

½ teaspoon salt

1 ½ cups coconut milk (a 13oz can)

1 teaspoon vanilla extract

½ to 1 teaspoon grated lemon zest

Directions

Heat your oven to 375F. Grease and flour an 8-inch cake pan.

Mix all the dry ingredients in a big bowl. Add the wet ingredients and stir until you have a moist batter with no dry pockets and few lumps.

Pour into the cake pan and bake for 30 – 40 minutes or until a toothpick inserted in the centre comes out clean. Allow to cool for about 15 minutes in the pan and then turn out onto a wire rack to finish cooling.

Serve cold or at room temperature.

coconutcakeside

Accessorize that cake!!

Coconut whipped cream and fruit

13 oz can of coconut milk – make sure it does not contain guar gum, which keeps the milk from separating. You WANT the milk to separate!

2 Tablespoons icing sugar

1 teaspoon vanilla extract

Fruit of your choice – berries, sliced peaches or plums, oranges etc.

Chill the can of coconut milk in the fridge for several hours. Open the can and scoop out the hardened coconut cream that’ has risen to the top of the can into a medium sized bowl – I prefer glass or metal, not plastic. You can save the remaining coconut water for smoothies (ugh) or tropical cocktails (hello rum and Curacao!). Add the vanilla and sugar and beat the coconut cream for about 3 minutes on medium-high speed until you have a thick cream that forms peaks. The cream will last covered in the fridge for 1-2 days but it’s best served immediately.

Serve the cake with the coconut cream, fresh fruit and toasted coconut.

Lemon glazed cake

CoconutCakeGlazed.jpg

¾ cup icing sugar

Juice of ½ lemon

¼ cup melted vegan margarine

Mix all the ingredients together until you have a runnyglaze and pour over the cake. Easy peasy lemon squeezy!

Beet, quinoa and kale salad

BeetKaleQuinoaSalad

I love the Thug Kitchen cookbook but, like all cookbooks, I find they are often unnecessarily labour intensive. I guess I’m a lazy-ass thug.

Here’s my lazy version of their beet and quinoa salad.

Ingredients

4-5 medium beets

2 cups kale washed and torn into bite-sized pieces

½ cup uncooked quinoa

Juice of 1 lemon (about ¼ cup)

2 green onions washed and sliced

2 clementine oranges peeled and segmented (optional)

2 Tbsp fresh dill or fresh parsley

2 Tbsp olive oil

Salt and pepper to taste (I used about ¼ tsp each)

1 tsp Dijon mustard

Directions

TIP: I recommend cooking the beets and quinoa the day before so they are nice and cool. If you put hot quinoa or beets on the kale, it’ll wilt.

Cook the quinoa by rinsing it in a mesh strainer and then putting it in a pot with 1 cup of water. Bring to a boil, then reduce to a simmer and simmer covered with a lid for 15 minutes until all the water is absorbed. Set aside to cool.

How to peel and cook beets easily

Slice the tops and bottoms off the beets. Place them in a pot with just enough water to cover them. Bring them to a boil, then reduce to a simmer and simmer for about 20 minutes. A fork will go in easily when they are cooked. Remove the beets from the heat and drain the water. Cover with cold water and let the beets sit for a few minutes. You want the beets to be cool enough to handle.

If you’re making the beets the night before, just drain off the water, put the lid on the pot and put the pot in the fridge.

When the beets are cool enough to handle, remove from the water and slip off the skins with your fingers. Slice the beets and place in a large bowl.

Add the quinoa, kale, green onions, parsley and/or dill and clementines, if using, to the bowl. Add the olive oil, lemon juice, salt, pepper and Dijon mustard and toss everything together. Serve up and enjoy!

Linguini with spicy peanut sauce, kale and tempeh

linguiniTempehKale

If you had told me even a year ago that I’d eat kale and tempeh and like it, I would have laughed at you. But this saucy number changed everything.

The original recipe is from The Thug Kitchen. This is my lazy-ass thug version.

I timed myself today making this dish: it took just 23 minutes from the moment I stepped in the kitchen to the time I sat down with a big bowl of tempting, spicy noodles!

Noodles with peanut sauce, kale and tempeh

10 oz linguine (or other pasta)

8 oz tempeh

1 bunch kale (about 6-8 cups once you’ve torn and washed it)

For the sauce

1/3 cup peanut butter (NOT the stuff with extra chemicals and sugar – just peanuts peanut butter)

1/3 cup vegetable broth

2 tsp chili paste (I used sambal oelek)

2 tsp chili powder

1 green onion sliced

2 cloves garlic minced

2 tsp grated ginger (or if you’re feeling super lazy, use ½ tsp ground ginger)

1/2 tsp ground cumin

1 ½ Tbsp dark sesame oil

Juice of ½ lime

1 ½ Tbsp rice vinegar

2 Tbsp soya sauce or tamari

Cook the linguini according to package instructions. Use a big pot because you’ll be adding the kale and tempeh.

Wash and tear the kale into bite-size pieces. Do not worry about drying the kale. It’s going in the pot.

Cut the tempeh into dice-sized cubes.

When the noodles are done, turn off the heat. Add the kale and tempeh. Doing this blanches the kale quickly and perfectly preps the tempeh, which can have a sour aftertaste if it’s not cooked/steamed.

As soon as you have everything in the pot, drain the water. Put it in a big bowl, awaiting sauce.

For the sauce – in a sauce pan, mix all the sauce ingredients over medium heat until they are blended. Pour over the noodles/kale/tempeh and toss together.

Enjoy!! Makes 4 delicious servings.