Sweet and easy lemon cookies

Lemon Cookies close.jpg

My lemon-loving friend, Michela, came for a visit this weekend so I tried a new recipe out for lemon cookies. These cookies are fast and easy to make, lightly lemony and incredibly addictive.
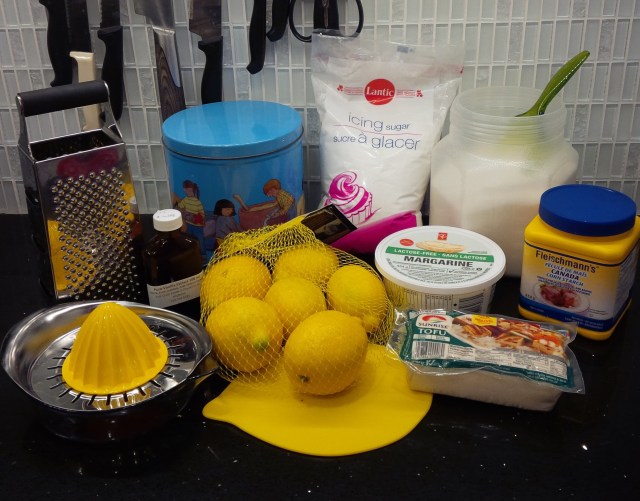
Ingredients.jpg

Ingredients

2 ½ cups flour

1 cup sugar (or 1 ½ cups sugar if you’re not using agave syrup)

¼ cup agave syrup

2 teaspoons baking powder

1/4 teaspoon salt

3 lemons – from these you will get:

  • 2 Tablespoons lemon zest (you will use all 3 lemons)*
  • ½ cup lemon juice (from 1 ½ lemons)

¾ cup canola or peanut oil

1 tsp vanilla

Lemon Cookies 2

Directions

Heat your oven to 360F.

In a large bowl, combine the dry ingredients – flour, sugar, salt, lemon zest and baking powder. Sift in the baking powder so you don’t have tiny lumps of it.

In a smaller bowl or even a mug, combine the wet ingredients – the lemon juice, oil, agave if using, and vanilla.

Make a well in the dry ingredients and pour the wet ingredients in. Mix with a spoon until combined. You’ll have an almost fluffy dough (that tastes really great even raw).

Drop the dough out by the teaspoon spacing the cookies about 2 inches apart. This is important because the cookies really flatten and spread. You should end up with 2 dozen cookies.

Bake for 8-10 minutes, until the cookies are golden. Let cool completely. The cookies will firm up as they cool.

These cookies would be delicious as part of a cookie sandwich with lemon sorbet!

*So this recipe will leave you with 1 ½ lemons that are sorely lacking most of their protective rind. Wrap the lemons in plastic wrap or store in an airtight container for up to 4 days in the fridge. You can use the lemons for juice for dishes such as linguini in lemon-garlic sauce, lemon tahini sauce, or chili sauce for spicy crispy tofu.

Pucker-up-baby lemon squares

LemonSquares.jpg
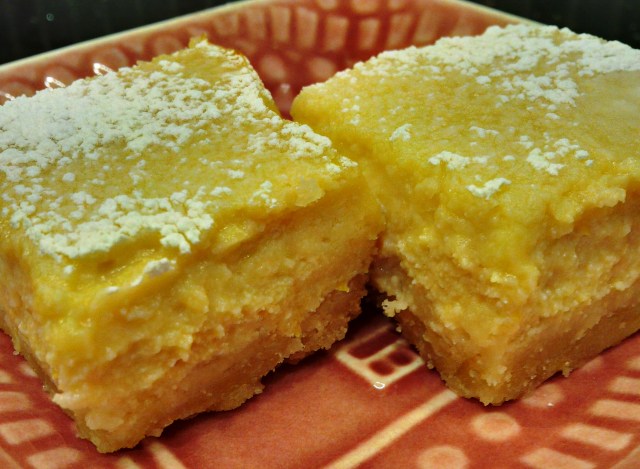
My lemon-loving friend, Michela, continues to inspire me to explore lemon-y desserts. Here’s the latest – the most glorious sweet and tart and lemon-y squares with a delightful shortbread crust. I pretty much followed the recipe exactly from My Darling Vegan except I didn’t use Meyer lemons, just the usual kind, which are much larger.

I didn’t know that Meyers were rather miniature so I ended up with a lot of leftover lemons… and you know what to do when life hands you lemons, right? Tequila time! But I digress.

ingredients.jpg

Here is My Darling Vegan’s recipe.

My only comments on My Darling Vegan’s recipe are:

1) you need the juice of 1 ½ regular lemons or 5-6 Meyer lemons.

2) you cannot whip this recipe up in a hurry. It’s simple but there’s cooling time needed in between steps.

So get baking! My edits/comments are clearly marked for you.

Shortbread Crust

1/2 cup vegan margarine

1/4 cup granulated sugar  (Make sure it’s vegan – some white sugars are “filtered” white using charred animal bones so check that the brand you’re buying is vegan or go with an unrefined granulated sugar.)

1 teaspoon lemon zest

1 cup all-purpose flour

Meyer Lemon Curd

1 package (12 oz) extra firm silken tofu

1/2 cup fresh Meyer lemon juice (5-6 lemons) or just lemon juice (1 ½ lemons)

1 teaspoon lemon zest

1 cup granulated sugar

1/4 cup powdered sugar

2 tablespoons cornstarch

1 teaspoon vanilla extract

SquaresClose.jpg

To make the crust

Preheat the oven to 350 degrees F. Line an 8×8 square baking pan with parchment paper and set aside.

In a stand-up mixer with the paddle attachment, beat Use a wooden spoon to cream the butter, sugar, and lemon zest together until smooth and creamy. Add the flour and mix until well incorporated.

Press the dough into the prepared pan and bake for 20 minutes until light golden brown. Remove from the oven and let cool for at least 15 minutes.

Do not switch the oven off yet.

To make the Lemon Curd

In a food processor combine tofu, lemon juice, zest, and granulated sugar and process until smooth and creamy, scraping down the sides as necessary.

Add the powdered sugar, cornstarch, and vanilla extract and process again until combined.

Pour onto the cooled crust and bake for another 25-30 minutes still at 350F until the lemon curd has set.

Let cool at room temperature for 20 minutes and then place in the refrigerator to cool all the way.

Dust with powdered sugar or candied lemon slices just before serving.

To cut, lift the dessert right out of the pan using the parchment paper. Cut into slices – should make 12-16 squares

Little lemon thugcakes with creamy lemon frosting

LemonCupcakeClose.jpg

My friend, Michela, likes lemon-y baked goods so I made her a batch of lemon cupcakes with creamy lemon icing. The recipe is from The Thug Kitchen cookbook with a few alterations (and no swearing – because the recipe is that easy!).

Ingredients

The cupcakes

1 ½ cups fine cornmeal (the kind you make polenta with)

¾ cups flour

¾ cup sugar (make sure it’s vegan sugar –not filtered through animal bone char! In Canada, Redpath sugar passes muster)

2 teaspoons baking powder

½ teaspoon salt

1 ½ cups coconut milk (a 13oz can)

1 teaspoon vanilla extract

The zest from ½ a lemon

The lemon icing

3 cups of icing sugar

½ cup vegan margarine at room temperature

1 tsp vanilla extract

2 Tbsp lemon juice (the juice of ½ lemon)

LemonCupcakeBit.jpg

Directions

Heat your oven to 375F. Grease a mini cupcake tin.

To make the cupcakes

Mix all the dry ingredients in a big bowl. Sift in the baking powder because you do not want to find weird, salty lumps of baking powder.

Make a well in the dry ingredients and the wet ingredients. Stir until you have a moist batter with no dry pockets and few lumps.

Spoon the batter into the cupcake tin and bake for 12 minutes or until a toothpick inserted in the centre comes out clean. Pop out each cupcake onto a platter and allow them to cool completely before frosting them.

To make the frosting

Mix all the ingredients together until you have a smooth creamy frosting. Be patient. You will feel like you can’t possibly get all that powdery sugar – which will fly everywhere if you are rushing – to incorporate into the small amount of margarine and liquid, but you will.

When the cupcakes are cooled to room temperature, spread about 2 teaspoons of frosting on each cupcake.

This recipe makes an ample amount of frosting because in my world, more is more.

This recipe makes two dozen mini-cupcakes.


Garlic-lemon-basil spread

GreenSpread.jpg

So sometimes life gives us happy accidents…like when I discovered that with slight alterations, the sauce I love to serve on pasta also makes an amazing spread or dip for crackers and veggie sticks. This spread is flavourful, healthy and super easy to make.

Ingredients

1 ½ avocadoes – peeled and pitted

The juice and zest of ½ a lemon

1-2 cloves garlic (or more if you like garlic!)

A handful fresh basil leaves –about ½ cup packed

A handful fresh kale or spinach leaves (optional)

1 tsp salt

¼ tsp pepper

¼ cup pistachios or walnuts (optional)


Directions

Put everything in a food processor and whirl until you have a smooth spread. Serve on crackers or with veggie sticks. I especially love this dip on endive leaves and garlick-y crackers.


Curried carrot (and other roots!) slaw

I’ve been eating this curried carrot slaw all summer and autumn and sharing it with friends too. It’s hugely popular – mix of creamy, sweet, crunchy, spicy, and tangy and it’s good for you. It’ll last for days in the fridge (though it’ll be gobbled up before then) and as the weather turns colder, I’m experimenting with adding in other root veggies – white turnips, kohlrabi, rutabaga etc. Give this one a try. It’s quick and easy and a brilliant side with everything!

In this photo, I’ve used a mix of different coloured carrots – yellow, orange and purple.CurriedCarrotSlaw1st.jpg

Ingredients

2 ½ cups grated carrots (or mix it up with up to one cup of other grated root veggies)

4 Tbsp vegan mayonnaise

2 Tbsp lemon juice (about 1/3 of a lemon)

1 Tbsp maple syrup

1 Tbsp curry powder

1 shallot minced

1-2 Tbsp raisins

1 – 2 Tbsp shelled pistachios (optional)

CurriedCarrotSlaw2.jpg

Directions

In a medium-sized bowl mix the mayonnaise, lemon juice, maple syrup, curry powder and minced shallot. Add the raisins and carrot and toss to combine. Serve topped with a few pistachios.

The Thug’s best cake

coconutcake3

I’ve been wanting to make this cake for nearly two years, ever since I was given The Thug Kitchen cookbook as a birthday gift. I’m so glad I finally had the occasion to make cake, because it’s divine – light, tasty, moist, super easy and just glorious.

Let me save you all that Thug swearing and share this recipe and my two riffs on it. Then go make the cake. JFDI, baby!

Ingredients

1 ½ cups fine cornmeal (the kind you make polenta with)

¾ cups flour

¾ cup sugar (make sure it’s vegan sugar –not filtered through animal bone char! In Canada, Redpath sugar passes muster)

2 teaspoons baking powder

½ teaspoon salt

1 ½ cups coconut milk (a 13oz can)

1 teaspoon vanilla extract

½ to 1 teaspoon grated lemon zest

Directions

Heat your oven to 375F. Grease and flour an 8-inch cake pan.

Mix all the dry ingredients in a big bowl. Add the wet ingredients and stir until you have a moist batter with no dry pockets and few lumps.

Pour into the cake pan and bake for 30 – 40 minutes or until a toothpick inserted in the centre comes out clean. Allow to cool for about 15 minutes in the pan and then turn out onto a wire rack to finish cooling.

Serve cold or at room temperature.

coconutcakeside

Accessorize that cake!!

Coconut whipped cream and fruit

13 oz can of coconut milk – make sure it does not contain guar gum, which keeps the milk from separating. You WANT the milk to separate!

2 Tablespoons icing sugar

1 teaspoon vanilla extract

Fruit of your choice – berries, sliced peaches or plums, oranges etc.

Chill the can of coconut milk in the fridge for several hours. Open the can and scoop out the hardened coconut cream that’ has risen to the top of the can into a medium sized bowl – I prefer glass or metal, not plastic. You can save the remaining coconut water for smoothies (ugh) or tropical cocktails (hello rum and Curacao!). Add the vanilla and sugar and beat the coconut cream for about 3 minutes on medium-high speed until you have a thick cream that forms peaks. The cream will last covered in the fridge for 1-2 days but it’s best served immediately.

Serve the cake with the coconut cream, fresh fruit and toasted coconut.

Lemon glazed cake

CoconutCakeGlazed.jpg

¾ cup icing sugar

Juice of ½ lemon

¼ cup melted vegan margarine

Mix all the ingredients together until you have a runnyglaze and pour over the cake. Easy peasy lemon squeezy!

Linguini with lentils and vegetables in a lemon-garlic dressing (the nut-free version)

LinguiniBroccoli2.jpg

I promised you a nut-free version of the creamy lemon-garlic dressing for pasta in my last post.

If green had a flavour, this would be it. Because you add the vegetables raw, this pasta dish is crunchy, flavourful and satisfying. It’s equally delicious hot or cold though, since I usually make it in the summer when all the garden veggies are at their best, I tend to eat this dish cold.

Try some other veggies too: zucchini, kale or spinach, red or yellow peppers.

I don’t have nut allergies so you’ll see in the photo that I have added toasted walnuts to my bowl. You can do the same by adding nuts at the time you’re serving the pasta. That way everyone can enjoy the dish the way that suits them best.

Ingredients

9 ounces uncooked linguini

1 big head broccoli – cut into bite size pieces

2 cups snow peas – cleaned and with stems cut off. ½ cup beluga lentils (uncooked)

Dressing

Juice from one lemon (about a scant ¼ cup)

2 tsp salt

1 tsp chili paste (like sambal oelek) – optional

3 cloves garlic minced

3 Tbsp olive oil

Directions

Cook the linguine according to package directions and place the cooked pasta in a large bowl.

Cook the lentils by adding 1 cup of water. Bring to a boil, then simmer with the lid on for 15 minutes. Let the lentils cool. You can even make them the day before and leave them in the fridge.

Add the broccoli, snow peas and lentils to the pasta. Mix all the dressing ingredients in a jar with a lid or a small bowl. Pour the dressing over the pasta and veggies and toss to combine. Chow down!

Linguini with lentils and fresh vegetables in a creamy lemon-garlic sauce

lemon-garliclinguini.jpg

Ahhhh… I’ve been on a bit of vacation and it was so nice to get back into the kitchen and creating. This recipe for linguini with a creamy lemon-garlic sauce is fast, easy, fresh and tangy. Use whatever blend of veggies you like. I used what arrived in my weekly organic farm box, but broccoli, zucchini, chard, corn kernels, even water chestnuts, would all make excellent additions or substitutions.

Next post, I’ll include a variation of this recipe that leaves out the almond butter. It’s ideal for people who have nut allergies but still want the zing of lemon-garlic dressing.

Ingredients

10 oz uncooked linguini

½ cup uncooked black (a/k/a beluga) lentils

1 red pepper diced

2 cups snow peas cleaned and cut in half

½ cup slivered almonds toasted (optional)

For the sauce

Juice of 1 lemon (about ¼ cup)

2 Tbsp almond butter

3 cloves garlic – minced

2 Tbsp olive oil or other light-tasting oil

1 Tbsp soya sauce

1 tsp sea salt (or to taste)

1 tsp hot chili paste (I use sambal oelek)

Directions

Cook the pasta according to package directions. Drain and place in a large bowl.

Place the lentils in a small pot with 1 cup of water. Bring to a boil, then reduce to a simmer and simmer for about 15 minutes until the lentils are cooked and the water is absorbed. When cooked, add to the bowl with the pasta. Add the snow peas and red pepper and any other vegetables you’re using.

To make the dressing, combine all the ingredients in a small glass or bowl and mix well. Pour over the pasta, lentils and vegetables and toss to combine. Sprinkle with the toasted almonds if using.

Serve up and enjoy. This dish makes 3-4 large servings and is equally delicious hot, cold or at room temperatures. Do store it in the fridge though!

Avocado pasta – creamy, garlicky, lemony and delicious

AvocadoPasta.jpg

This pasta surprised me with its simplicity and deliciousness. It’s easy to make, no fail and will be ready in the time it takes to cook the pasta.

Make this. That’s all I can say. Just make this.

You will need a food processor for this recipe.

Ingredients

1 avocado

The juice and zest of ½ a lemon

1-2 cloves garlic

A handful fresh basil leaves –about ½ cup

1 cup of fresh kale or spinach leaves

½ tsp salt

¼ tsp pepper

¼ cup pistachios (optional)

10 ounces of uncooked pasta – any shape or kind

avocadopasta2.jpg

Directions

Cook the pasta according to package directions.

While the pasta is cooking, place all the other ingredients in a food processor and whiz until you have a creamy sauce. You might need to add up to 2 tablespoons water to get a creamy consistency. The more you whiz the sauce, the smoother it will be. Spinach also makes a smoother sauce than kale.

Place the hot, cooked pasta in a large bowl and spoon the sauce over it. Toss to blend and serve. This recipe makes 2-3 servings.

If you have leftovers, this dish is great at room temperature as a cold pasta salad.


Chickpea and avocado spread – simply delicious!

hummusrolldouble.jpg

Various friends on Facebook have been sharing this recipe video over and over, so I decided to give it a go for myself. It just seemed too easy and too plain. Boy was I wrong. It’s simple and simply delicious!

My only change was to add Frank’s hot sauce to the mix and to put the salt and pepper right in the food processor. Otherwise, I made this dish just as shown. Here’s the recipe again:

Ingredients

15 oz can chickpeas drained and rinsed

1 avocado

The juice of ½ a lemon

Salt and pepper to taste (I used about ¼ tsp each)

1 Tbsp Frank’s hot sauce (optional).

hummusrollsingle.jpg

Directions

Place everything in a food processor and mix until everything is smoothly combined. Serve on bread or in a wrap or on crackers. Here’s mine wrapped in an Afghani flat bread with spinach, tomato and cucumbers. SO GOOD.

And that’s a wrap!