Mango coconut quinoa

MangoQuinoaSalad.jpg

This dish is so simple and easy yet tasty beyond belief. It has it all – chewy, crunchy, savoury, sweet and loaded with nutrients to fuel you through the day. It’s also one of my favourite lunches to tote to work.

Ingredients

1 cup uncooked quinoa

1 mango – peeled and diced

1 red pepper – diced

¼ cup unsweetened shredded coconut

½ cup fresh or frozen edamame (let the edamame thaw if you use frozen)

1/3 cup almond slivers toasted

1/3 cup diced onion (red onion makes for a prettier salad)

The zest of two limes

¼ cup balsamic vinegar*

2 Tbsp chopped fresh cilantro (optional)

MangoQuinoaSaladClose.jpgDirections

Rinse and cook the quinoa in 2 cups of water. When the quinoa is cooked, fluff it with a fork and let it cool. You can do this step ahead of time – even the day before.

Toss all the ingredients together in a large bowl. I like to let the dish sit for an hour in the fridge to let the flavours blend before serving.

Makes 4 meal-size servings.

*I have a coconut balsamic vinegar that I used in this recipe. If you’re into flavoured vinegars, this is a great dish to experiment with some of the different flavours.

Avocado pasta – creamy, garlicky, lemony and delicious

AvocadoPasta.jpg

This pasta surprised me with its simplicity and deliciousness. It’s easy to make, no fail and will be ready in the time it takes to cook the pasta.

Make this. That’s all I can say. Just make this.

You will need a food processor for this recipe.

Ingredients

1 avocado

The juice and zest of ½ a lemon

1-2 cloves garlic

A handful fresh basil leaves –about ½ cup

1 cup of fresh kale or spinach leaves

½ tsp salt

¼ tsp pepper

¼ cup pistachios (optional)

10 ounces of uncooked pasta – any shape or kind

avocadopasta2.jpg

Directions

Cook the pasta according to package directions.

While the pasta is cooking, place all the other ingredients in a food processor and whiz until you have a creamy sauce. You might need to add up to 2 tablespoons water to get a creamy consistency. The more you whiz the sauce, the smoother it will be. Spinach also makes a smoother sauce than kale.

Place the hot, cooked pasta in a large bowl and spoon the sauce over it. Toss to blend and serve. This recipe makes 2-3 servings.

If you have leftovers, this dish is great at room temperature as a cold pasta salad.


Chickpea and avocado spread – simply delicious!

hummusrolldouble.jpg

Various friends on Facebook have been sharing this recipe video over and over, so I decided to give it a go for myself. It just seemed too easy and too plain. Boy was I wrong. It’s simple and simply delicious!

My only change was to add Frank’s hot sauce to the mix and to put the salt and pepper right in the food processor. Otherwise, I made this dish just as shown. Here’s the recipe again:

Ingredients

15 oz can chickpeas drained and rinsed

1 avocado

The juice of ½ a lemon

Salt and pepper to taste (I used about ¼ tsp each)

1 Tbsp Frank’s hot sauce (optional).

hummusrollsingle.jpg

Directions

Place everything in a food processor and mix until everything is smoothly combined. Serve on bread or in a wrap or on crackers. Here’s mine wrapped in an Afghani flat bread with spinach, tomato and cucumbers. SO GOOD.

And that’s a wrap!


Hasselback apples – apple, caramel and a nutty crunch.

hasselbackalldressed

A couple years ago, everyone was making hasselback potatoes. Now it’s hasselback apples. This is my vegan version.

So what’s a hasselback? It refers to slicing a potato, or in this case apple, in thin slices almost all the way through but not quite. The final effect reminds me of a little hedgehog or armadillo.

This hasselback potato.pngis a hasselback potato – you can see how it’s sliced, ready to impress.

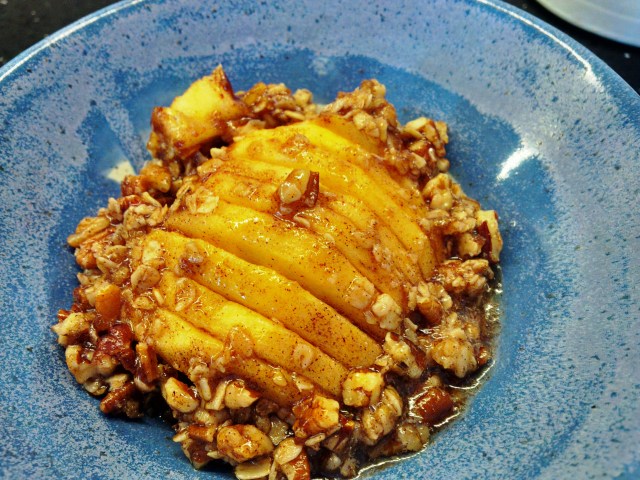
We’re going to do the same thing to an apple, then drizzle it with a delicious sauce that turns into caramel as it bakes. Oh yeah.

Hasselback apples look fancy schmancy but they’re really just an apple cobbler all dressed up for a party.

I’m giving you the proportions for one apple and you can easily scale up the recipe from there.

Ingredients

1 apple – I used a yellow delicious.

1½ Tbsp vegan margarine

1 ½ Tbsp brown sugar

1 tsp ground cinnamon

1 Tbsp flour

1 Tbsp rolled oats

1 Tbsp chopped pecans, walnuts or almonds (optional). I used chopped pecans.

hasselbackundressed.jpg

Directions

Heat your oven to 400F.

Peel the apple and cut it in half. Carefully remove the core; if you have a melon baller, that’s an ideal tool to use. You want the apple half to remain intact. Place the apple half cut side down and slice ¼ inch wide slices into the apple almost all the way through but not quite. You should be able to fan the slices open, but not have the apple fall apart.* Repeat with the second apple half.

Grease a small oven-safe dish and place the hasselbacked apple halves into the dish.

Melt ½ tablespoon margarine with 1 tablespoon brown sugar and ½ teaspoon cinnamon. Spoon this mixture evenly over the apple halves.

Cover and bake the halves for 10 minutes.

In the meantime, mix the remaining ingredients together to create a streusel crumble mixture. After the apples have baked for 10 minutes, spoon this mixture evenly onto the apples. You can try to get the mixture down between the slices, but it’s not necessary.

Bake for another 10 minutes uncovered.

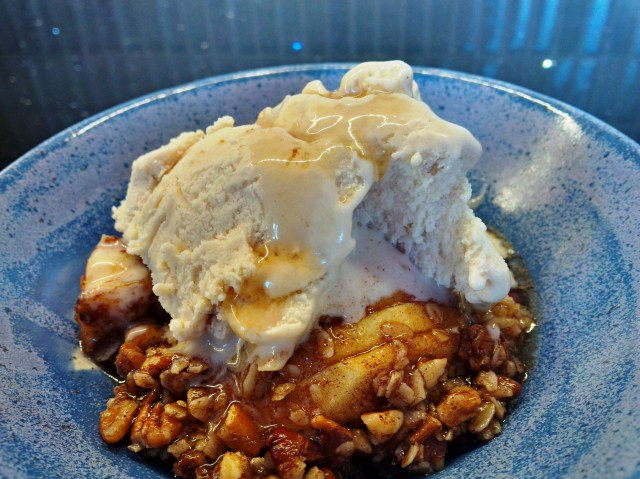
Serve each hasselback apple with the now carmelized brown sugar-cinnamon sauce spooned over top. Seriously – all that stuff that’s in the bottom of the baking dish, scoop it up and put it back on the apple and eat it.

Serve the apples with vegan ice cream – I’m a huge fan of So Delicious (cashew-based) brand – and a drizzle of maple syrup.

*Oh oh! I sliced too far. My apple fell apart. Now what? Not to worry. Just break the apple up into chunks and bake it in a ramekin. It will be a mini-cobbler instead of a hasselback and just as delicious either way!

Iron-lady lentil burgers with mustard sauce

lentilburger.jpg

I love lentils. I love burgers. I love mustard. I HAD to try this recipe – especially because it was just weird enough to work. The original recipe is from One Green Planet. I have modified both the ingredients and the process to amp up the flavour and nutrients and simplify the cooking (because I am lazy).

I’m calling these iron-lady lentil burgers because between the spinach, lentils and raisins you have one fibre, protein and iron-rich meal.

There is something about these burgers that makes me think they a) would make excellent sliders and b) would be a favourite with children. The patties are super even textured and have just a hint of sweetness.

You will need a food processor for this recipe.

Ingredients

The mustard sauce

3 Tbsp prepared yellow mustard

4 Tbsp maple syrup

1 tsp dry mustard

½ tsp curry powder

The burgers

1 cup of uncooked lentils. I used Du Puys lentils because they cook in just 15 minutes.

1 carrot – cleaned and cut into rough chunks

1/3 cup raisins (any type)

½ cup walnut pieces

½ cup rolled oats

¼ cup bread crumbs (or just use ¾ cup rolled oats or ¾ cup breadcrumbs – whatever you prefer)

1 cup fresh spinach leaves

2 Tbsp of the mustard sauce

1 tsp salt

A few grinds of black pepper

1 tsp hot sauce (optional)

1-2 Tbsp water

Directions

Cook the lentils according to package directions – typically 2 cups of water for 1 cup of dry lentils.

Pre-heat your oven to 400F.

Prepare the mustard sauce by mixing all the ingredients together in a small bowl or jar (you end up with about ½ cup of sauce).

Put all the burger ingredients in a food processor and process until you have a very smooth mixture. I ended up with a rather large and dry ball of patty mix so I added the 2 Tbsp of water to make the mix a bit more malleable.

Divide the patty mixture into four equal portions. Shape into patties and place on a greased cookie sheet. Bake at 400 for 10 minutes and flip the patties, then bake for another 5-10 minutes (depending on your oven).

Serve with the mustard sauce. I topped mine with tomato, lettuce and pickled onions. These burgers would be ridiculously delicious on a pretzel bun!

Real vegans fake it – rice paper bacon

FakeBacon.jpg

So my Facebook friend, Bob Kurtz, casually mentions to me in a chat “Have you tried rice paper bacon yet?” No, I had not. But once Bob showed me this video and pictures of his own creations, I was IN!

This is faux bacon made from rice paper and marinade. It’s ridiculously easy to make, inexpensive, tasty, crispy and gives you the salty, smoky, chewy flavour which is what any sane human is actually craving when they think they want bacon.

I googled a few different ways to make this bacon and this is my version.

Ingredients

8 sheets of rice paper

6 Tbsp nutritional yeast (Bob grinds his in a coffee grinder to get a fine powder)

2 Tbsp neutral tasting oil like canola oil

3 Tbsp soya sauce

½ tsp liquid smoke

½ tsp maple syrup (Bob and I both agree on this)

A pinch of smoky paprika

FakeBacon2.jpg

Directions

Heat your oven to 400F. Line a baking sheet with parchment paper.

Combine all the ingredients except the rice paper in a small bowl. Add about 2 Tbsp water to get a gravy-like consistency.

Cut your rice paper into strips about 1” wide. I had difficulty cutting the dry rice paper without it snapping so I took two sheets at a time and quickly ran them under tap water and cut them while damp.

When you have your strips cut in a double thickness (see video again), dip them in water once more, use your fingers like a squeegee to slip off the excess water and then coat them in your marinade.

Place each strip on your parchment lined pan.

Bake for 8-10 minutes at 400 degrees. Watch them. Just like pig-bacon, they can go from crisp to burnt quickly.

Bob fries his bacon as per the video and also lets it cool off on a baking rack so that that his strips have the classic wavy ripple to them.

I want to have breakfast with Bob some day.

Mushroom broccoli quiche with a brown rice crust

VeggieBrownRiceQuiche.jpg

This quiche is a tasty, low-calorie way to get the perfect balance of complex carbs, veggies and protein. It’s also extremely low fat yet filling. I love it with Franks hot sauce for breakfast.

If you’ve got leftover rice, here’s a great way to use it up. You’ll need 2 cups of cooked rice.

Ingredients

1 cup uncooked brown rice (or 2 cups cooked rice)

12 oz package medium-firm or firm, silken tofu

1/3 cup nutritional yeast

1 Tbsp cornstarch or tapioca powder (I only had tapioca powder so that’s what I used)

1 Tbsp tahini

½ tsp onion powder

½ tsp turmeric

2 tsp sea salt

1 tsp dijon mustard

1 Tbsp A-1 sauce

Freshly ground pepper to taste (I used about ¼ tsp)

1 bunch asparagus cut into 1” pieces or about 2 ½ cups broccoli florets (whichever is in season)

¼ cup shallots minced

1 clove garlic minced

1 ½ cups sliced mushrooms

1 red pepper diced

Olive oil or cooking spray

VeggieRiceCrustQuiche.jpg

Directions

Cook the brown rice in 2 cups of boiling water. The rice will take about 30 minutes to cook. You can cook the rice ahead of time. Allow it to cool slightly.

Preheat the oven to 350 and grease a 9-inch, round baking dish with the olive oil or other cooking spray.

Put the tofu, nutritional yeast, salt, pepper, Dijon mustard, tapioca powder or cornstarch, tahini, A1 sauce, onion powder, turmeric, salt and pepper in a blender and blend until smooth. You should have a thick, smooth pancake batter-like mix.

Mix about ¼ cup of this batter with the rice, then pat the rice into the greased round dish to form a crust. Bake the rice crust for 8-10 minutes and remove from the oven. Leave the oven on at 350F.

Sprinkle the shallots, broccoli or asparagus, red pepper and mushrooms over the rice crust. Pour the remaining tofu batter over top evenly and smooth out.

Bake for 60 minutes. Allow the quiche to cool for about 10 minutes before slicing and serving.

Enjoy!

My recipe is an alteration of Susan Voisin’s original from her blog the Fat Free Vegan.


A stack o’ quesadillas with black beans and sweet potato

Quesadilla.jpg

So this happened in my kitchen the other night. Someone had told me, quite definitively, that quesadillas must have cheese and could not have beans. “Oh yeah,” I thought to myself. Let’s see about that.

I created a stack of beany, cheesy, creamy quesadillas and baked them all together. Black beans and sweet potato give the dish an incredible creaminess. The result is , if not authentically Mexican, still a fiesta in your mouth!

Ingredients

3 large tortillas or even flat bread

1 cup of shredded vegan cheese – I used Daiya pepperjack flavour cheese

1 cup of bottled salsa

1 cup of unsweetened, unflavoured plant-based milk

1 Tbsp olive oil

1 ½ cups cooked black beans (a 15 oz can drained and rinsed)

1 red pepper diced

1 clove garlic minced

1 onion diced

1 sweet potato

1-2 Tbsp chipotle adobo sauce (optional but mmm… the spice!) or a jalapeno, deseeded and minced

1 Tbsp chili powder

1-2 Tbsp fresh cilantro (optional)

1 cup fresh spinach finely chopped (optional)

1 tsp cumin

½ tsp dried oregano

½ tsp dried basil

Directions

Wash but do not peel the sweet potato. Dice it and either microwave it or bake it until it’s soft. If you’re baking it – 350F for about 15 minutes. Set aside.

Mix the milk and the salsa together and set aside.

In a large saucepan, heat the olive oil. Add the onion, garlic and red pepper and saute until the onion is softened. Add the chili powder, cumin, basil and oregano and heat through. Add the chipotle adobo sauce or jalapeno if using and heat through. Switch off heat. Add the beans, sweet potato, spinach and cilantro and mix together.

Oil a 9” pie plate or other casserole dish. If you’re not using a round dish, you will have to cut the tortillas to fit the dish. Line the bottom with one of the tortillas. Add half of the black bean mixture. Sprinkle with 1/3 cup cheese. Spoon 1/3 of the salsa/milk mixture over top. Repeat with another tortilla, the remaining bean mixture, 1/3 cup of the cheese and 1/3 of the salsa/milk mixture. Place the last tortilla on top. Pour the remaining salsa/milk mixture over then the remaining cheese.

Bake at 350F for 30 minutes. Let the dish stand for a few minutes before cutting and serving. Enjoy!


Creamy mac and cheese – finally!

MacandCheese.jpg

It finally happened. After testing quite a few vegan mac and cheese recipes, I have found one that I like. Hooray! This recipe is straightforward (like Grade 8 Home Ec straightforward), uses only inexpensive pantry/fridge staples, and can be ready in the time it takes to cook pasta.

The result is a creamy, satisfying and filling meal that will keep you revved for hours.

My coworker refers to this as mac and yeast and you’ll soon see why.

Ingredients

12 oz of macaroni, fusilli or other firm, short pasta

½ onion minced finely (or even whizzed in the blender)

4 Tbsp vegan margarine

4 Tbsp flour

3 cups unflavoured plant-based milk

1½ cups nutritional yeast

1-2 tsp sea salt

2 Tbsp Dijon mustard

½ tsp black pepper

1 tsp garlic powder

1 tsp onion powder

MacandCheese2

Directions

Cook the pasta in a large pot according to package directions. Drain and set aside.

While the pasta is cooking, heat the margarine on medium heat in a 1 quart pot. Sauté the onion in the margarine until the onion is softened. Add the flour and stir until you have a roux (a thick paste of flour and margarine/onion). Add half the milk and whisk constantly until the roux is incorporated into the milk and you have a smooth sauce. Add the rest of the milk, the mustard and all the seasonings. Stir to incorporate everything together and simmer stirring regularly. This will make the sauce thickens slightly. Add the nutritional yeast and stir in to combine.

Once you have a sauce that’s the consistency of a thin pancake batter you are good to go since the sauce will thicken slightly as it cools. Pour over your pasta and enjoy.

This dish is great with hot sauce or chili sauce and a side of green peas and broccoli.

I want to add that I have heavily based this recipe on an existing Internet recipe that I printed off months ago with no attribution showing. So…. if you come across a similar recipe elsewhere on the ‘net, they, not me, are the originator!

The reincarnation of the Waldorf Salad

WaldorfSalads

When a good Waldorf Salad dies, it comes back in its next life as this salad. Gone are the eggy mayonnaise and whipping cream. Instead you get all the Waldorf deliciousness and crunch with a halo of compassionate goodness.

Ingredients

½ bunch of kale (about 4 cups) cleaned and torn into bite-size pieces. If you don’t like or have kale, raw spinach is an excellent replacement.

1 red apple cored and diced. A red delicious apple is ideal.

1 cup of grape halves

1 stalk of celery diced

Sunflower seeds or chopped walnuts for garnish (optional)

Dressing

¼ cup Vegenaise or other vegan mayo-style dressing

¼ cup unsweetened, plain vegan yogurt (Yoso is my chosen brand)

1 Tbsp maple syrup

1 Tbsp cider vinegar

Pinch of salt

Few grinds of pepper

1 tsp Dijon mustard

Directions

Place the kale, apple, celery and grapes in a salad bowl. Mix the dressing ingredients in a small bowl or mug and pour over the salad. Toss to combine and serve. Garnish with sunflower seeds or walnuts, if you like. Enjoy!