Spicy pickled zucchini slices

zucchini.jpg

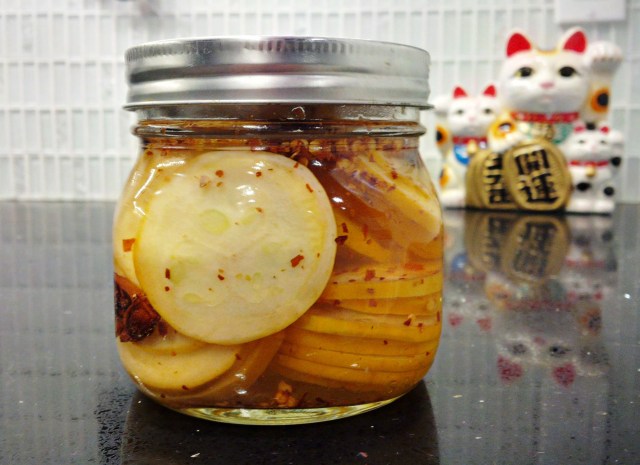
Everyone is humblebragging about their surprisingly massive zucchinis and fauxmoaning on what to do with this summer’s harvest. And we’ve all made suggestions. Now here’s something completely different. I grabbed this recipe from the Bon Appetit website and have been making Szechuan zucchini slices for a few summers.

These zucchini slices are pickled but require no special equipment, no canning savvy and pose no threat of weird botulism spores (real canning freaks me out just a little).

Hot, sweet and salty, these slices will last for up to 2 weeks in the fridge and make a pretty hostess gift.

Watch for these slices to appear in an upcoming blog post accompanying an Asian slaw and  orange-peanut sweet potato burgers.

Note you need to make these slices at least 24 hours before you plan to eat them.

Ingredients

1 zucchini – either green or yellow – washed and sliced into thin coins

2 Tbsp granulated sugar (make sure the brand you buy is vegan*)

1 Tbsp salt

1 tsp chili flakes

2 whole pieces star anise

½ cup water

½ cup unseasoned rice vinegar (do NOT use seasoned rice vinegar – it’ll over-flavour and salt the brine).

Directions

Put the sliced zucchini into a 2 cup (500 ml) canning jar. Drop in the star anise and the chili flakes.

Mix the sugar, salt, vinegar and water in a cup or jar until the sugar and salt are dissolved. Pour this brine over the slices, seal the jar and store in the fridge. Let the slices sit for at least 24 hours before eating. They will last up to 2 weeks in the fridge.

*What? What’s this about white sugar not being vegan?? Yup. That’s right. Many manufacturers of granulated white sugar filter the product through animal bone char to create snowy white sugar. Ugh. If you don’t want death at your door, check out the manufacturing process for the brand you buy (in Canada, Redpath is a vegan brand). Now you know why vegans with a sweet tooth love their agave, dates and maple syrup so much.


Orange-peanut sweet potato and rice patties with a side of slaw

PeanutPatty2

Yesterday I posted photos of pickled zucchini slices. That recipe was all in aid of these – some of the most delicious, satisfying, make-your-belly-happy patties you’ll ever enjoy.

Sweet potato and brown rice serve as a base for a sweet, salty, spicy and peanut-y taste palette that is pure delight.

My version is a riff on a recipe from One Green Planet. I upped the seasonings and got rid of the bun.

I’ve posted three recipes here: the orange-peanut sweet potato and rice patties, the miso sauce you can use both to dress a side of slaw and drizzle on the patties (it also makes a fantastic stir fry sauce), and the slaw ingredients.

Ingredients

For the patties

2 medium sweet potatoes

1 cup cooked brown rice

A flax egg made from 1 ½ Tbsp ground flax mixed with 3 ½ Tbsp water

3 Tbsp orange marmalade

4 ½ Tbsp peanut butter (just peanuts-and-oil peanut butter –none of that stuff with weird ingredients like icing sugar!)

3 Tbsp soya sauce or tamari

2 -3 tsp Sriracha sauce

1 tsp ground cumin

1 tsp ground ginger

3 Tbsp mixed nuts or peanuts chopped (optional – for garnish)

For the dressing

3 Tbsp white miso

2 Tbsp unseasoned rice vinegar

2 Tbsp water

1 Tbsp soya sauce or tamari

1 Tbsp maple syrup

2 Tsp Sriracha sauce

For the slaw

1 kohlrabi peeled and grated. You will have about 1 ½ cups shredded kohlrabi. If you don’t have or want kohlrabi, use shredded green cabbage or napa cabbage.

1-2 green onions cleaned and sliced

4 radishes sliced

1 rib celery diced

1 carrot grated (optional)

1 small can water chestnuts drained and diced (optional)

PeanutPatty

Directions – the patties

Wash and dice the sweet potatoes into evenly sized pieces. You can peel the potatoes if you like, but it’s not necessary. Place the potatoes in a microwaveable dish and microwave for about 3-4 minutes until the pieces are soft. Once the pieces are cool enough to handle, mash them.

Preheat your oven to 400F.

In a large bowl, mix the rice and mashed sweet potatoes. Add the flax egg and use your hands to combine the ingredients.

Add the remaining ingredients and stir or use your hands to combine everything. I find it helpful to microwave the marmalade and peanut butter together for about 15-20 seconds to soften them up for easier mixing.

Form 3 very large or 4 large patties. The patties will be thick. Place them on a greased cookie sheet, or a cookie sheet lined with parchment paper, and bake for 20 minutes, then turn the patties over and bake another 15 minutes.

Because these patties are full of complex carbs, I preferred eating them with a dressing and skipped the bun. You could serve them on a bun with the slaw on top.

I sprinkled chopped mixed nuts on top for extra crunch and flavour.

Directions – the dressing

While the patties are baking, mix all the dressing ingredients in a jar or bowl with a lid. Use the dressing to pour over the patties and as the dressing for your slaw.

This dressing also makes a fantastic stir fry sauce.

Directions – the slaw

While the patties are baking, mix all the slaw ingredients together. Mix 2-3 Tbsp of the dressing into the vegetables and toss to combine.


Linguini with lentils and vegetables in a lemon-garlic dressing (the nut-free version)

LinguiniBroccoli2.jpg

I promised you a nut-free version of the creamy lemon-garlic dressing for pasta in my last post.

If green had a flavour, this would be it. Because you add the vegetables raw, this pasta dish is crunchy, flavourful and satisfying. It’s equally delicious hot or cold though, since I usually make it in the summer when all the garden veggies are at their best, I tend to eat this dish cold.

Try some other veggies too: zucchini, kale or spinach, red or yellow peppers.

I don’t have nut allergies so you’ll see in the photo that I have added toasted walnuts to my bowl. You can do the same by adding nuts at the time you’re serving the pasta. That way everyone can enjoy the dish the way that suits them best.

Ingredients

9 ounces uncooked linguini

1 big head broccoli – cut into bite size pieces

2 cups snow peas – cleaned and with stems cut off. ½ cup beluga lentils (uncooked)

Dressing

Juice from one lemon (about a scant ¼ cup)

2 tsp salt

1 tsp chili paste (like sambal oelek) – optional

3 cloves garlic minced

3 Tbsp olive oil

Directions

Cook the linguine according to package directions and place the cooked pasta in a large bowl.

Cook the lentils by adding 1 cup of water. Bring to a boil, then simmer with the lid on for 15 minutes. Let the lentils cool. You can even make them the day before and leave them in the fridge.

Add the broccoli, snow peas and lentils to the pasta. Mix all the dressing ingredients in a jar with a lid or a small bowl. Pour the dressing over the pasta and veggies and toss to combine. Chow down!

Linguini with lentils and fresh vegetables in a creamy lemon-garlic sauce

lemon-garliclinguini.jpg

Ahhhh… I’ve been on a bit of vacation and it was so nice to get back into the kitchen and creating. This recipe for linguini with a creamy lemon-garlic sauce is fast, easy, fresh and tangy. Use whatever blend of veggies you like. I used what arrived in my weekly organic farm box, but broccoli, zucchini, chard, corn kernels, even water chestnuts, would all make excellent additions or substitutions.

Next post, I’ll include a variation of this recipe that leaves out the almond butter. It’s ideal for people who have nut allergies but still want the zing of lemon-garlic dressing.

Ingredients

10 oz uncooked linguini

½ cup uncooked black (a/k/a beluga) lentils

1 red pepper diced

2 cups snow peas cleaned and cut in half

½ cup slivered almonds toasted (optional)

For the sauce

Juice of 1 lemon (about ¼ cup)

2 Tbsp almond butter

3 cloves garlic – minced

2 Tbsp olive oil or other light-tasting oil

1 Tbsp soya sauce

1 tsp sea salt (or to taste)

1 tsp hot chili paste (I use sambal oelek)

Directions

Cook the pasta according to package directions. Drain and place in a large bowl.

Place the lentils in a small pot with 1 cup of water. Bring to a boil, then reduce to a simmer and simmer for about 15 minutes until the lentils are cooked and the water is absorbed. When cooked, add to the bowl with the pasta. Add the snow peas and red pepper and any other vegetables you’re using.

To make the dressing, combine all the ingredients in a small glass or bowl and mix well. Pour over the pasta, lentils and vegetables and toss to combine. Sprinkle with the toasted almonds if using.

Serve up and enjoy. This dish makes 3-4 large servings and is equally delicious hot, cold or at room temperatures. Do store it in the fridge though!

Millet and quinoa porridge with fruit

milletporridgeblueberry.jpg
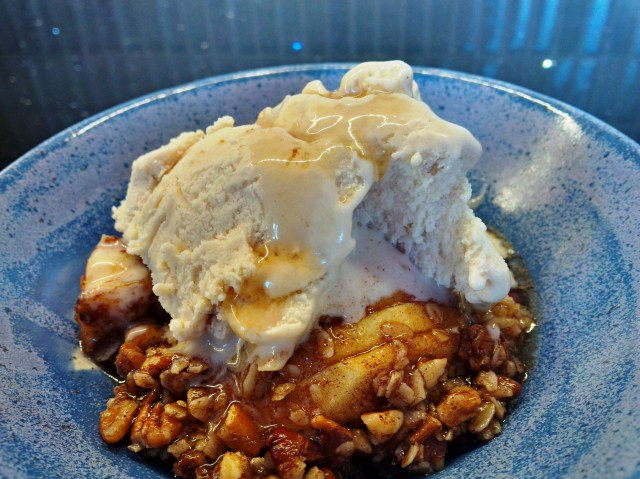
You are looking at a photo of a happy accident. Last week I meant to cook up a big pot of quinoa. I accidentally mixed millet with the quinoa and ended up with a big pot of rather bland porridge. A few spices and some fruit and the porridge was easily rejuvenated into a delicious, nutritious and energizing breakfast.
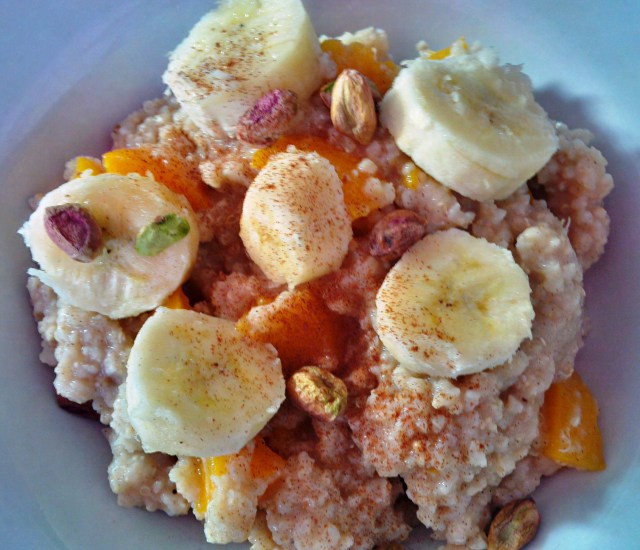
If you haven’t tried millet, I strongly encourage you to do so. Yes, it’s essentially birdseed, but it’s also a delicious, mild-tasting nutrition powerhouse packed with fibre, protein, iron, magnesium and vitamin B6.

Ingredients

½ cup quinoa – rinsed but not cooked

½ cup millet

½ cup unsweetened applesauce

½ cup plant-based milk (sweetened or unsweetened, even vanilla flavour, as you prefer)

1 Tbsp maple syrup or agave nectar (or more to taste)

1 tsp ground cinnamon

A pinch of cardamom

½ tsp pure vanilla extract

Directions

Cook the quinoa and millet in 2 cups of water. Bring to a boil and then reduce to a simmer and simmer for about 20 minutes. Remove from heat and add the remaining ingredients.

You can eat this porridge hot or cold and it’ll last for a few days in the fridge.

I topped my porridge with diced peaches, a drizzle of warmed blueberries (heat them in the microwave until they’re soft or in a small pan with a squeeze of lemon over low heat) and walnuts.

Here are some other combos to consider:

milletporridgeandbanana.jpg

  • Mango, kiwi, coconut and macadamia nuts
  • Pears, a dash of cloves and pecans
  • Bananas, apricots and pistachios
  • Plums, cherries and hazelnuts
  • Pureed pumpkin, raisins, pumpkin seeds and walnuts and a sprinkle of nutmeg


Red lentil dal – dishing up some red hot love

redlentildal

I love Indian food, and lucky me, I got to spend a month in the south of India partaking of some of the best Indian meals any person has ever enjoyed.

This recipe for red lentil dal is highly westernized but no less flavourful and nourishing than the more exotic originals. What it is though, is faster to make using ingredients that are readily available in North America and Europe. Don’t let the long list of ingredients deter you – it’s mostly spices you likely already have in your cupboard.

Ingredients

2 cups red lentils

1 Tbsp coconut oil (or olive oil)

1 large onion diced

2 Tbsp curry paste (I use Thai Kitchen brand)

1 heaping Tbsp curry powder

1 tsp ground turmeric

1 tsp cumin

1 tsp chili powder

1 tsp salt

1 tsp sugar

3-4 cloves garlic minced

1 tsp ground ginger

1 tsp sambal oelek (chili paste)

½ tsp ground cinnamon

¼ tsp ground cloves

397 ml can tomato paste (13.5 oz)

1 cup chopped spinach (optional)

2 tomatoes diced

Directions

Cook the lentils. You need 4 cups of liquid. I use a mix of vegetable broth and water. You can use just water or all vegetable broth. Bring the lentils and liquid to a boil, then reduce to a simmer and simmer covered. The lentils will only take about 15 minutes to cook. There may be a tiny amount of liquid in the pot and that’s okay. Set aside.

In a large pot, melt the coconut oil. Add the diced onion and cook on medium-low heat for about 15 minutes, stirring often, until the onions are golden.

Add all the spices and seasonings: curry paste, curry powder, cumin, tumeric, chili powder, sambal oelek, garlic, sugar, salt, cinnamon, cloves and ginger and heat through combining with the onion. Add the chopped tomato and combine. Add the tomato paste and spinach and combine. Last, add in the cooked lentils and mix everything together.

Serve with basmati rice, samosas and chapati bread. Mmmmm.


Mango coconut quinoa

MangoQuinoaSalad.jpg

This dish is so simple and easy yet tasty beyond belief. It has it all – chewy, crunchy, savoury, sweet and loaded with nutrients to fuel you through the day. It’s also one of my favourite lunches to tote to work.

Ingredients

1 cup uncooked quinoa

1 mango – peeled and diced

1 red pepper – diced

¼ cup unsweetened shredded coconut

½ cup fresh or frozen edamame (let the edamame thaw if you use frozen)

1/3 cup almond slivers toasted

1/3 cup diced onion (red onion makes for a prettier salad)

The zest of two limes

¼ cup balsamic vinegar*

2 Tbsp chopped fresh cilantro (optional)

MangoQuinoaSaladClose.jpgDirections

Rinse and cook the quinoa in 2 cups of water. When the quinoa is cooked, fluff it with a fork and let it cool. You can do this step ahead of time – even the day before.

Toss all the ingredients together in a large bowl. I like to let the dish sit for an hour in the fridge to let the flavours blend before serving.

Makes 4 meal-size servings.

*I have a coconut balsamic vinegar that I used in this recipe. If you’re into flavoured vinegars, this is a great dish to experiment with some of the different flavours.

Avocado pasta – creamy, garlicky, lemony and delicious

AvocadoPasta.jpg

This pasta surprised me with its simplicity and deliciousness. It’s easy to make, no fail and will be ready in the time it takes to cook the pasta.

Make this. That’s all I can say. Just make this.

You will need a food processor for this recipe.

Ingredients

1 avocado

The juice and zest of ½ a lemon

1-2 cloves garlic

A handful fresh basil leaves –about ½ cup

1 cup of fresh kale or spinach leaves

½ tsp salt

¼ tsp pepper

¼ cup pistachios (optional)

10 ounces of uncooked pasta – any shape or kind

avocadopasta2.jpg

Directions

Cook the pasta according to package directions.

While the pasta is cooking, place all the other ingredients in a food processor and whiz until you have a creamy sauce. You might need to add up to 2 tablespoons water to get a creamy consistency. The more you whiz the sauce, the smoother it will be. Spinach also makes a smoother sauce than kale.

Place the hot, cooked pasta in a large bowl and spoon the sauce over it. Toss to blend and serve. This recipe makes 2-3 servings.

If you have leftovers, this dish is great at room temperature as a cold pasta salad.


Chickpea and avocado spread – simply delicious!

hummusrolldouble.jpg

Various friends on Facebook have been sharing this recipe video over and over, so I decided to give it a go for myself. It just seemed too easy and too plain. Boy was I wrong. It’s simple and simply delicious!

My only change was to add Frank’s hot sauce to the mix and to put the salt and pepper right in the food processor. Otherwise, I made this dish just as shown. Here’s the recipe again:

Ingredients

15 oz can chickpeas drained and rinsed

1 avocado

The juice of ½ a lemon

Salt and pepper to taste (I used about ¼ tsp each)

1 Tbsp Frank’s hot sauce (optional).

hummusrollsingle.jpg

Directions

Place everything in a food processor and mix until everything is smoothly combined. Serve on bread or in a wrap or on crackers. Here’s mine wrapped in an Afghani flat bread with spinach, tomato and cucumbers. SO GOOD.

And that’s a wrap!


Hasselback apples – apple, caramel and a nutty crunch.

hasselbackalldressed

A couple years ago, everyone was making hasselback potatoes. Now it’s hasselback apples. This is my vegan version.

So what’s a hasselback? It refers to slicing a potato, or in this case apple, in thin slices almost all the way through but not quite. The final effect reminds me of a little hedgehog or armadillo.

This hasselback potato.pngis a hasselback potato – you can see how it’s sliced, ready to impress.
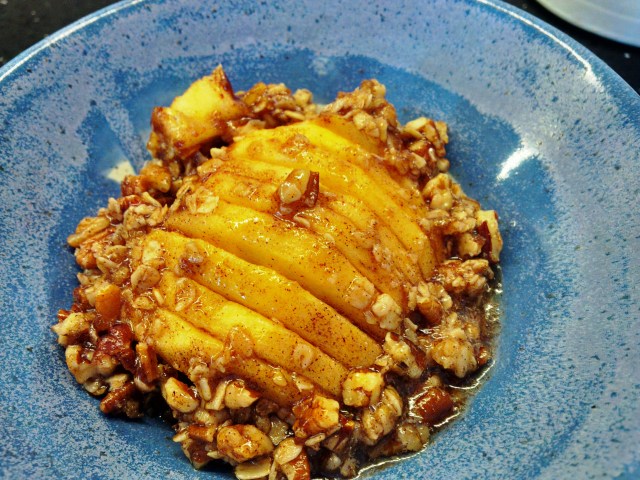
We’re going to do the same thing to an apple, then drizzle it with a delicious sauce that turns into caramel as it bakes. Oh yeah.

Hasselback apples look fancy schmancy but they’re really just an apple cobbler all dressed up for a party.

I’m giving you the proportions for one apple and you can easily scale up the recipe from there.

Ingredients

1 apple – I used a yellow delicious.

1½ Tbsp vegan margarine

1 ½ Tbsp brown sugar

1 tsp ground cinnamon

1 Tbsp flour

1 Tbsp rolled oats

1 Tbsp chopped pecans, walnuts or almonds (optional). I used chopped pecans.

hasselbackundressed.jpg

Directions

Heat your oven to 400F.

Peel the apple and cut it in half. Carefully remove the core; if you have a melon baller, that’s an ideal tool to use. You want the apple half to remain intact. Place the apple half cut side down and slice ¼ inch wide slices into the apple almost all the way through but not quite. You should be able to fan the slices open, but not have the apple fall apart.* Repeat with the second apple half.

Grease a small oven-safe dish and place the hasselbacked apple halves into the dish.

Melt ½ tablespoon margarine with 1 tablespoon brown sugar and ½ teaspoon cinnamon. Spoon this mixture evenly over the apple halves.

Cover and bake the halves for 10 minutes.

In the meantime, mix the remaining ingredients together to create a streusel crumble mixture. After the apples have baked for 10 minutes, spoon this mixture evenly onto the apples. You can try to get the mixture down between the slices, but it’s not necessary.

Bake for another 10 minutes uncovered.

Serve each hasselback apple with the now carmelized brown sugar-cinnamon sauce spooned over top. Seriously – all that stuff that’s in the bottom of the baking dish, scoop it up and put it back on the apple and eat it.

Serve the apples with vegan ice cream – I’m a huge fan of So Delicious (cashew-based) brand – and a drizzle of maple syrup.

*Oh oh! I sliced too far. My apple fell apart. Now what? Not to worry. Just break the apple up into chunks and bake it in a ramekin. It will be a mini-cobbler instead of a hasselback and just as delicious either way!